Search This Blog

Sunday, September 25, 2022

New Digs

We're reaching the point of unpacking and settling into our new home when I can begin to set up my workbenches.  Yes, workbenches, plural.  During the lockdown I had set up a small bench in our bedroom in order to have a quiet space in a full house.  My main workbench was in our long living room, shared with our boys' gaming computer, my wife's workbench for her crafts*, our television and seating area, all adjacent to the dining room and kitchen.  Quiet, focused time with a model was rare unless I got up early or stayed up late, so having that small bench in a room where I could shut the door and put on some music to drown out the world for a while was critical to my sanity.

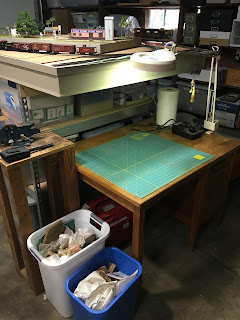
Garage bench slowly coming back to life.

Now in our new home I have the blessing of a detached garage.  Yes, despite the challenges of model building in a non-climate controlled space, it is a blessing.  I suspect it will become better with time as I insulate the space, but for now it presents the same challenges as the previous attached garage - too hot in the summer afternoons and likely too cold in the winter.  Also, while California is dry most of the time, it is our proximity to the sea that gives us the cool overnight temps.  However, this brings with it moist air, and our winters are wet.  So where can I find a space in the house to work?

 New bench beneath the window used to be my wife's crafting table.

In the new house there's a 'den' or 'family room' at the back of the house where I can set up a small bench - larger than my old bedroom bench, but not large enough for spreading out a big project.  I'll be sharing this space with my boys' computer again, and a TV, but this time in a smaller room.  Just like the last house, my bench will be under a window and next to a sliding glass door leading out to the back yard and in this case, the garage.  In the old place there was an area for parts, tools, etc. and train magazines along a wall next to the workbench.  So too here, but instead of old dorm-room pine shelves from Ikea, we've ordered new finished open shelves for books and a central display cabinet with glass doors -  for models, of course - also from Ikea.  We like Ikea.  

Hopefully in a few weeks I'll be able to show off the new spaces as I expect them to look when fully operational.  First up on the den workbench will be Star Wars Legion figures in need of paint, and in the garage, the Milk & Mail train continues with the Combine car.   What's on your workbench these days? 

*My wife's craft space, by the way, is now in its own cabinet but in the living room at the front of the house.


Tuesday, September 13, 2022

Diorama Design and Composition

I'm not a professional artist with training or any formal education in the subject, but I know what I like.  That is to say, I have an idea of what a scene could be or might be before I begin building it, and I learn whether or not I like that idea as I build the scene.  As various elements like buildings or major land forms or trees are brought to the space the idea might shift and change.  That was certainly the case with my Walthers National Model Railroad Build Off 2022 diorama.

Click on the image above then open in a new tab to see a really BIG version.

At first I wasn't even going to enter the contest simply because I was already building a railroad and had a good head of steam and didn't want to lose momentum on that project.  But when I figured I could build a diorama using elements that would find a home on the railroad, and potentially win a little cash to fund the hobby, well, it wasn't hard to commit to the endeavor.  So I set about I making a few sketches of a scene that might easily incorporate models I knew I'd want on the railroad that I already had on hand.  I chose the structures based on how long it might take to build them the way I like them considering the four month time frame of the contest.

Once the structures were selected I could consider their arrangement.  I've always liked intersections and streets, especially the way they relate to the structures alongside them and the way they fit into or shape the natural setting.  Add a railroad to the mix and it gets really interesting.  In this case I decided to keep the freight railroad element to a minimum - a spur for the mill - while giving more emphasis to the horse-drawn street railway, a unique element less commonly modeled.  I considered running streets and tracks parallel to the diorama edges at first, but migrated toward an offset angled configuration to allow more room to develop the grounds of each structure and set it in its context.

The "quadrants" of the scene, defined by the major streets, are not evenly balanced yet the structures and scenic elements give them appropriate weight.  The large Purina building occupies a smaller area than the two smaller structures diagonally opposite.  Think of a beam scale, how the smaller weight slides along a long bar to balance the heavy weight on the other side.

Elements like the farm field, the orange grove, the family garden behind the cottage or the Florida scrub habitat could all be modeled in part along the diorama edge and the angled orientation would give the impression they continued on beyond the edge of the diorama.  A parallel orientation might give the idea that the field or grove ended at the edge.  We assume the streets continue even when perpendicular or parallel to the edge because that's a more commonly seen trope on many model railroads.  Still, I believe even they benefit from the angled treatment.   

Structure roof-lines were also considered in the composition of the scene.  Strong parallel lines like rails running down the brick street give the eye a path to follow.  Other elements interrupt that flow while some reinforce it.  Roof lines can do either or both.  Natural elements like the orange grove can be parallel to the street and reinforce the motion while creating rhythm.  The dirt road breaks the rhythm and lets the eye jump across the street to a different area.  The billboard is set at an angle to the road and is the only man-made element oriented that way; the rest are parallel or perpendicular to each other.

 
Note the color, texture, and the way the elements interact with the edge.  We know that driveway keeps going and turns toward the back porch.  So too the lawn and garden continue.  The strong roof lines direct the eye through the scene and the colors of the house both reflect the tans and reds of the scenery.

Color was a major element considered in the composition.  The bold patterns and patriotic colors of the Purina Mill really stand out against the greens and browns of the landscape.  So too the white billboard.  Across the street, however, the colors are more subdued.  Yes, the fruit stand is garish, but the yellow, orange and green are echoes of the orange grove.  The colors for the Queen Anne style cottage were chosen from actual home colors used in the period.  The maroon and tan on the cottage echo the brick street and sandy soil.

Perhaps the most important color on the diorama was the street itself.  I chose a dark brick color with blue tones to simulate the over-fired bricks used on streets in Florida from that period.  The tan earth of the sandy dirt roads and driveways contrasts with the brick, as does the bright green grass.  I found several photos showing the sand blown onto the road and wanted to highlight this effect.  The other major color consideration was the foliage, from the faded lime green of the palm fronds to the deep dark green of the orange trees and every shade in between.  Florida is a green, lush place, and the foliage needed to reflect that vibrancy.

 
From the muted dark green of the Oak behind the cottage to the vibrant bright spring green of the lawn, I hoped to capture some of Florida's lush and diverse foliage, both in color and texture.  Look closely and you'll spot the Azalea in bloom.  Liriope lines the front path.
  
The final element I considered in the composition was the placement of figures and mini-scenes.  That topic will get a post of its own.  Thanks for reading and feel free to comment or ask questions.  I hope these ideas help you create interesting scene compositions on your dioramas or model railroads.

Sunday, September 4, 2022

A Better Purina Building

... or, simple upgrades to make a classic kit into a stand-out structure.  This post is yet another in the series about how I built my diorama for the Walthers National Model Railroad Build Off 2022.

I've always admired the Suydam Purina Building with its bold checkerboard graphics.  During the course of building mine, I discovered that the checkerboard pattern dates back as far as 1903-4, and the further back you go, the more elaborate the pattern becomes.  Back then the checkerboard was painted on just about any surface from wagons to walls, and whatever wasn't red and white check was a deep blue.  As time passed the amount of surface area covered in the ubiquitous checkered pattern diminished so if you're modeling a more recent structure, less is best.  However, for my 1914 diorama, the building as printed fits right in.  Even the typeface is a great match for that era and beyond.

The kit reflects the standard of the time (mid 50s? - HO Seeker shows it in the 1956 Suydam catalog), with window frames printed on acetate, die-cut walls and overly large-section stripwood.  The few metal castings for the roof details are nice, but you're set up to fail with the heavy copper wire that must be bent carefully to become piping and soft flat metal strips for struts.  I tried, and failed to achieve a result I was pleased with, eventually using bits from my scrap box to cobble together the support.  Your mileage may vary.  The platforms and steps were simple wood shapes meant to be painted to look like concrete and the kit included "skylights", more akin to clerestory roofs, made of similar wood shapes to be covered in paper.  I chose not to use this detail, but a skylight from Campbell would make a better substitute.

To begin the upgrade, I substituted Tichy windows for the printed acetate.  All that was necessary was to widen the die-cut openings ever so slightly and paint the window frames brown to match the lower wall sections.  Next I made new freight doors from old plastic Ertl box-car floors since they were scribed with wide board detail.  Some cross braces completed the transformation.  For the main door and office door I found two metal castings from my collection, probably from Sequoia and Dyna Models, respectively.  Since one freight door would be posed open I created a simple floor and walls for the warehouse area that might be seen through the opening 

The card roof in the kit was simply coated with a piece of 220 grit sandpaper which was painted and heavily weathered to resemble tar and gravel roofing.  The corner trim and wall cornice was made with the stripwood from the kit augmented with some finer sizes from my supply.  The printed walls were left unmodified but the corrugated walls were marked with a pencil and scibed to created the illusion of individual panels.  After the building was assembled these were lightly weathered to further that effect.  A note here - brace, brace, BRACE!  No, we're not crashing, but even with the bracing I added to the roof it still managed to warp a little.  This isn't noticeable unless you look for it and the problem would go away if I were gluing the roof to the walls but I wanted to leave it removable for future interior detailing.

The front porch was made by layering scribed paneling to the sides and individual boards to the top of the wood block provided in the kit.  The metal roof is the kit roof, again marked and scribed to simulate individual panels, over a stripwood frame.  For the side loading dock I scratchbuilt a simple structure from scale lumber and stained it to look like treated wood that had begun to bleach in the sun.  This structure, like the others on the diorama, is not intended to look that old so the weathering was restrained.  One interesting detail on the dock ramp is the cleats running up one half of the ramp.  This is a detail I observed in old photos but have never seen modeled before.  Another oft-forgotten detail is the downspout.  I created two from square styrene stock and painted them brown, applying them to the sides near the front porch.

As for additional details and figures I added a few carefully selected details rather than a buckshot smattering of junk.  Near the loading dock I placed two old pallets, a trash can and a dolly loaded with sacks.  At the base of the ramp are four large barrels.  A horse is tied to a hitching post - a lovely cast metal part whose origins are unknown.  On the front porch is a scale, but the main area of interest is the loading dock where three figures are posed.  One man sits on the dock listening to another tell a tale while a third has just emerged from the loading doorway to see what's going on outside.  Perhaps he is wondering why the work has stopped.

Is this kit overused?  Maybe in a previous era.  Peruse any year of Model Railroader from the 60s or 70s and you'll likely spot one in the Photos section or on a layout.  John Allen had one, so there's that.  It is colorful and stands out in a scene.  But today's prototype modelers are more interested in modeling "the ordinary", or what George Sellios called "boring".  I tend to agree with him and yet, there was a time in our history when such structures as this were the prototype and there was nothing ordinary about them.  Give this kit some love and it can be a stand-out structure on your railroad too.