Search This Blog

Showing posts with label brick street. Show all posts

Saturday, August 26, 2023

Horse Car Revival

Since the early planning stages of the Pine Branch Park pike, I have endeavored to tell a story.  That story is about the changes in transportation and its effects on the culture of 1920s Florida.  This transition period - not the steam-to-diesel transition period of oft modeled by so many - saw the shift from horse-drawn to horseless carriages.  By the late '20s the horse-drawn streetcar had been replaced by a horseless car of another kind, still on rails, but drawing power from overhead wires.  If not, then it was replaced by the automobile and its tracks in the street pulled up or simply paved over unceremoniously. 

Neatly paved street track in Jacksonville, 1920.

That ripping out of the old was what I sought to portray on the main street of Ocala Springs.  I had plans for a street crew to be digging out bricks (follow this link for inspiration in that regard) and loading them into a wagon, and rail being put onto a truck for delivery to the scrap dealer. This would be an interesting scene in itself, but when another wagon's wheels got bound up in the street track and tipped over its load, a traffic jam ensued - naturally, at an intersection, to cause the most chaos.  Now we're talking.  Humor and interest.  The old Horse Car was not to be scrapped, but instead purchased by that entrepreneur, Strickland, and placed on a display track as a tourist trap roadside attraction where visitors could have their picture made as a souvenir.

Horse car in Ocala; appears to be broad gauge.

But recently I've been considering the disposition of dioramas.  Last year's NMRBO entry was built around a brick street with the horse-drawn streetcar modeled in service, rolling down "Orange Avenue".  What if that track never went out of service?  Sure, the last horse car ran in San Francisco in 1913, and my diorama was set in 1914, but the Ocali Creek is set in the late 1920s.  Did horse cars survive that long?  According to J.H. White Jr., "...New York, had a few horsecars running until July 1917. Pittsburgh ran its last hay burner in 1923, and Sulphur Rock, Arkansas, shut down the U.S. horsecar era in 1926."  Well, horse-puckey.

So now I'm faced with a wonderful dilemma where both options are interesting.  Either I live with the anachronism and keep the old nag pulling her coach, or I proceed as planned and show the line as being removed.  In these sorts of cases I tend to look at the pros and cons for each scenario and make a decision after I've mulled it over a while.  In this case, I'm in no hurry, but this is the best time for this sort of cogitation, when there's no rush.  So I drew up a plan, or rather, modified the existing plan to include a rough indication of the functioning (or not) horse car line and a car barn with attached stable.  Here 'tis:

Click on the image to see it larger.

The horse car track is shown in red.  The curves are a bit sharp and would likely be eased a bit.  Though the car itself actually rolls, this won't be an operating model as I haven't perfected the miniaturizing gun to work on living tissue, beyond the odd pigeon, and I'm not sure what you'd feed a miniature horse.  The car barn and stable shown in orange would probably be either an ornate affair with some gingerbread or a simple shed.  There would also be a passenger platform (not shown) near the station so the horse car could make connections with local branch passenger trains.

Of course some of you may have already hit on the compromise I may inevitably take, to do both.  That is, to lay this track including a now-shuttered car barn and depict the line as being removed by the road gang.  But there is another option still.  I could install overhead wires over the main street portion in front of the businesses and place a cute little Birney there, as if the line were still in operation now converted to electricity.  Hmmm...maybe I'll have a bowl of oats then hit the hay and think about this in the morning.  Feel free to leave your thoughts in the comments.

Tuesday, September 13, 2022

Diorama Design and Composition

I'm not a professional artist with training or any formal education in the subject, but I know what I like.  That is to say, I have an idea of what a scene could be or might be before I begin building it, and I learn whether or not I like that idea as I build the scene.  As various elements like buildings or major land forms or trees are brought to the space the idea might shift and change.  That was certainly the case with my Walthers National Model Railroad Build Off 2022 diorama.

Click on the image above then open in a new tab to see a really BIG version.

At first I wasn't even going to enter the contest simply because I was already building a railroad and had a good head of steam and didn't want to lose momentum on that project.  But when I figured I could build a diorama using elements that would find a home on the railroad, and potentially win a little cash to fund the hobby, well, it wasn't hard to commit to the endeavor.  So I set about I making a few sketches of a scene that might easily incorporate models I knew I'd want on the railroad that I already had on hand.  I chose the structures based on how long it might take to build them the way I like them considering the four month time frame of the contest.

Once the structures were selected I could consider their arrangement.  I've always liked intersections and streets, especially the way they relate to the structures alongside them and the way they fit into or shape the natural setting.  Add a railroad to the mix and it gets really interesting.  In this case I decided to keep the freight railroad element to a minimum - a spur for the mill - while giving more emphasis to the horse-drawn street railway, a unique element less commonly modeled.  I considered running streets and tracks parallel to the diorama edges at first, but migrated toward an offset angled configuration to allow more room to develop the grounds of each structure and set it in its context.

The "quadrants" of the scene, defined by the major streets, are not evenly balanced yet the structures and scenic elements give them appropriate weight.  The large Purina building occupies a smaller area than the two smaller structures diagonally opposite.  Think of a beam scale, how the smaller weight slides along a long bar to balance the heavy weight on the other side.

Elements like the farm field, the orange grove, the family garden behind the cottage or the Florida scrub habitat could all be modeled in part along the diorama edge and the angled orientation would give the impression they continued on beyond the edge of the diorama.  A parallel orientation might give the idea that the field or grove ended at the edge.  We assume the streets continue even when perpendicular or parallel to the edge because that's a more commonly seen trope on many model railroads.  Still, I believe even they benefit from the angled treatment.   

Structure roof-lines were also considered in the composition of the scene.  Strong parallel lines like rails running down the brick street give the eye a path to follow.  Other elements interrupt that flow while some reinforce it.  Roof lines can do either or both.  Natural elements like the orange grove can be parallel to the street and reinforce the motion while creating rhythm.  The dirt road breaks the rhythm and lets the eye jump across the street to a different area.  The billboard is set at an angle to the road and is the only man-made element oriented that way; the rest are parallel or perpendicular to each other.

 
Note the color, texture, and the way the elements interact with the edge.  We know that driveway keeps going and turns toward the back porch.  So too the lawn and garden continue.  The strong roof lines direct the eye through the scene and the colors of the house both reflect the tans and reds of the scenery.

Color was a major element considered in the composition.  The bold patterns and patriotic colors of the Purina Mill really stand out against the greens and browns of the landscape.  So too the white billboard.  Across the street, however, the colors are more subdued.  Yes, the fruit stand is garish, but the yellow, orange and green are echoes of the orange grove.  The colors for the Queen Anne style cottage were chosen from actual home colors used in the period.  The maroon and tan on the cottage echo the brick street and sandy soil.

Perhaps the most important color on the diorama was the street itself.  I chose a dark brick color with blue tones to simulate the over-fired bricks used on streets in Florida from that period.  The tan earth of the sandy dirt roads and driveways contrasts with the brick, as does the bright green grass.  I found several photos showing the sand blown onto the road and wanted to highlight this effect.  The other major color consideration was the foliage, from the faded lime green of the palm fronds to the deep dark green of the orange trees and every shade in between.  Florida is a green, lush place, and the foliage needed to reflect that vibrancy.

 
From the muted dark green of the Oak behind the cottage to the vibrant bright spring green of the lawn, I hoped to capture some of Florida's lush and diverse foliage, both in color and texture.  Look closely and you'll spot the Azalea in bloom.  Liriope lines the front path.
  
The final element I considered in the composition was the placement of figures and mini-scenes.  That topic will get a post of its own.  Thanks for reading and feel free to comment or ask questions.  I hope these ideas help you create interesting scene compositions on your dioramas or model railroads.

Thursday, August 11, 2022

Cable Car Conversion

This post is the fourth in the series about how I built my Walthers National Model Railroad Build Off diorama.  In the first post I described how I made the brick street.  Next I discussed the thought process behind kitbashing a vintage plastic kit.  Last week I talked about some of the lessons I learned designing and composing the diorama itself.  This time I'm going to show how I kitbashed a Bachmann Cable Car into a horse-drawn streetcar.  

Here's the cable car during deconstruction and conversion.  I've been to San Francisco many times and I rode the cable cars years ago.  On a more recent trip my wife and I spent more time riding the buses, but I digress.  Next is a photo of the initial reconstruction.

In the above image the roof has been shortened and tacked together and the ends are being modified.  The donor car is, admittedly, pretty cheap but I think it has great potential.  They can be found on eBay or at train shows for a decent price.  Originally I planned to build a streetcar as a decomsissioned vehicle now placed as a tourist attraction at Strickland's Store on my late 20s era Pine Branch Park layout.  This is, ultimately, where this model will end up.  But for this diorama it needed to be in service.

The body shell has been given a coat of primer and the gaps from the roof reduction filled with putty and wet sanded.  The frame was scratchbuilt from styrene with end plates and railings in brass, soldered.  The bearings came from a Selley old-time passenger truck and the wheels are O scale spoked speeder wheels from Wiseman Model Services drilled to accept the axles from the Selley wheelsets.  The horse is a heavy metal casting, probably lead, of what I think is a circus horse; see the pointy thing between his ears.  This was carefully filed away and the head reshaped.

Here is a prototype picture I found.  There are many designs for streetcar bodies and most are similar, resembling a short coach body with clerestory roof and open platforms.  This particular prototype matches very closely the Bachmann cable car body, right down to the gentle arches in the windows.  Had I not been pressed for time, I may have modeled more of the lovely detail on the end platform railing and panel.  Mine is far simpler but still conveys the essence of the thing.

Lettering was done mostly one letter at a time using an alphabet sheet from K4 decals.  I chose Orange Avenue because it fit neatly using the yellow letters I had and helped set the scene in Florida.  The paint scheme was chosen after looking at several preserved horse drawn streetcars.  Yellow and brown seemed to be a popular combination, and the Tuscan Red roof is a classic choice.  I painted the horse as a big Palomino draft horse.  I already had dark brown and medium brown horses and a gray mule on the diorama, so it seemed a good choice.  

The tackle was mostly cast onto the horse but the reins are made from black electrical tape.  The swingle tree was scratchbuilt from styrene and wire with scale chain superglued into an arc behind it.  These bits are fiddly but the result is worth it in terms of realism and a fine scale look.  The driver is a Weston figure and the passengers are two seated townspeople from the Lytler & Lytler Ragtimers series.  The car body is removable to allow access to the interior.

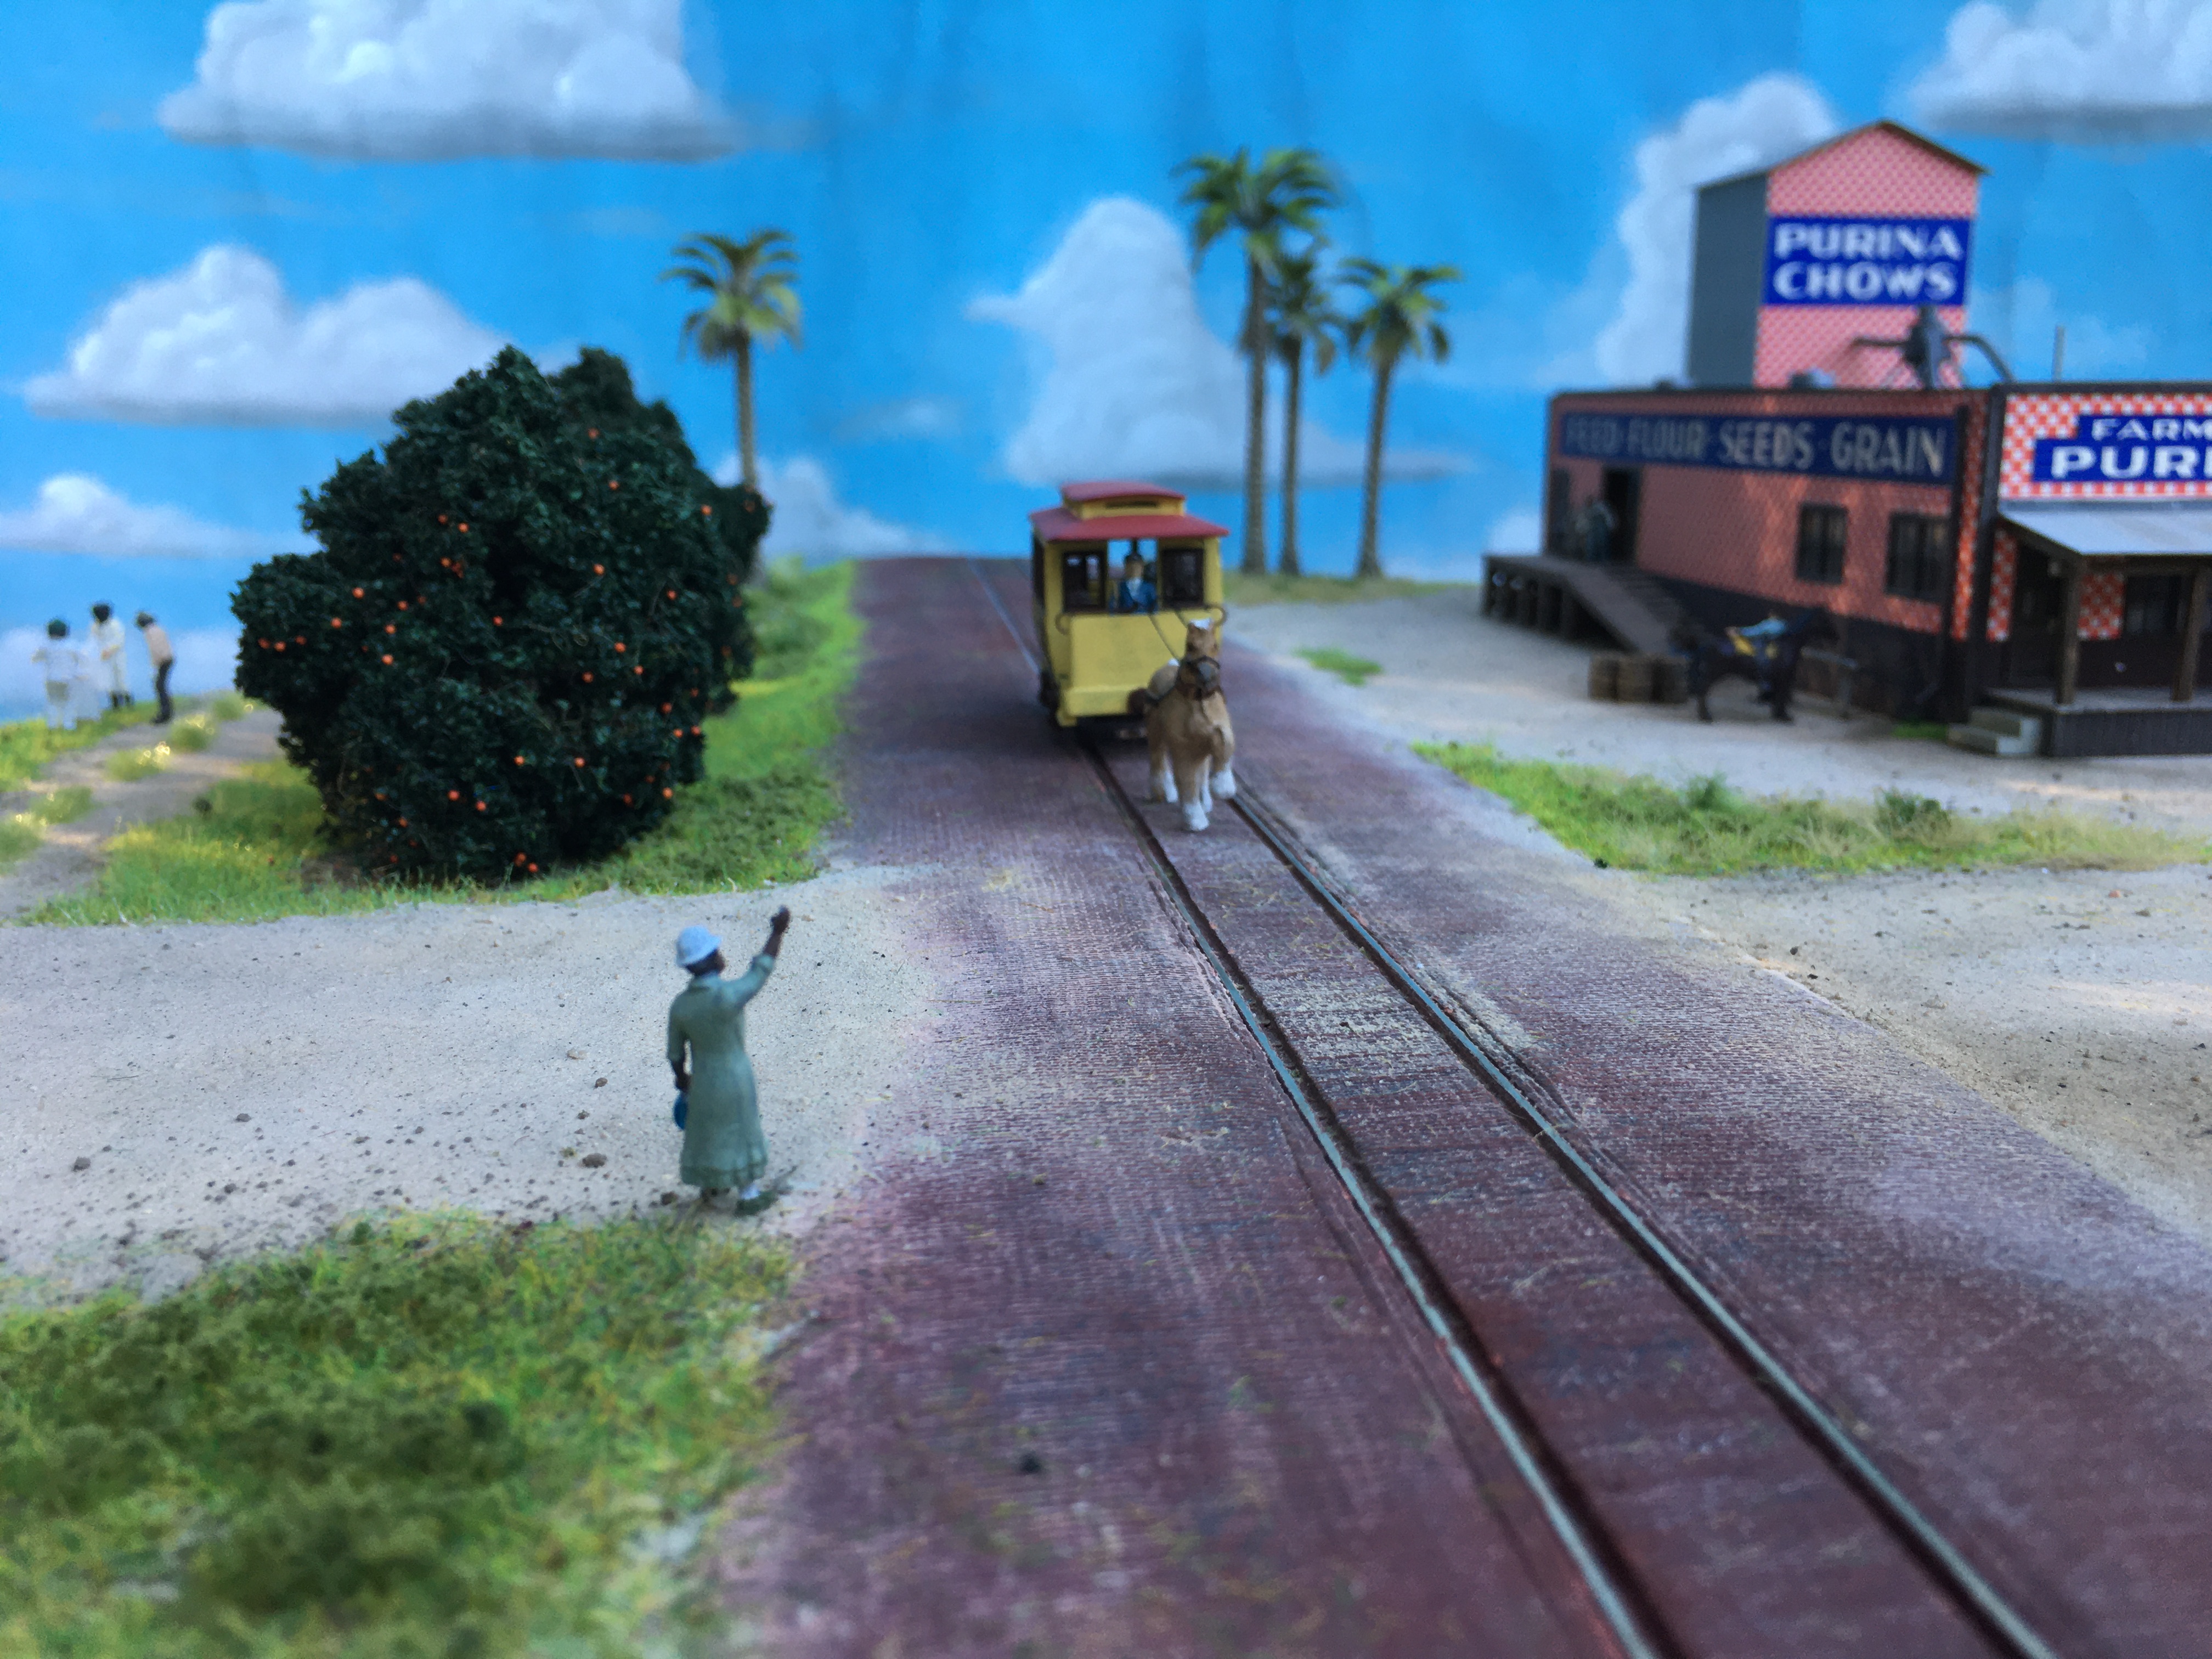
This last image sets the streetcar into the story.  The woman hailing the car is from Preiser.  I didn't submit this shot due to the obvious wrinkles in the sky, the poor lighting, and lack of focus at various depths.  Still, I like it for the story it tells.  Three mini-scenes are visible in this one shot, and they will be the subject of a future post.  I had a great time kitbashing this little car and using it to paint a picture of life at the turn of the previous century.

As always, thanks for reading, and feel free to leave your comments and questions in the field below.


Tuesday, July 19, 2022

Old Florida Brick Street

This post is the first of several detailing how I built my diorama for the Walthers National Model Railroad Build Off 2022 (nmrbo22 in the tags).  In this installment, I show how I built the brick street.

When I decided that I needed to have a brick street on my diorama I began searching for options on how to make one.  Walthers sells a plastic kit with injection-molded segments that looks pretty good, but then you've got to deal with section joints - not impossible, but not how I wanted to go.  Also, it's pretty hard to get the crown of the street looking realistic.  Brick texture sheets in plastic and laser-cut material are also available but present similar challenges.

Here's a prototype image of the look I was going for.  This image in general was a great source of inspiration for the overall look of the diorama, with a streetcar track added of course:

Finding no ready-made solution, I looked into making my own.  First I tried hand-embossing brick using a paintbrush ferrule with the bristles removed and bent into a crude rectangle.  The material is DAS clay and the girder rail is simply two rails with one laid sideways up against the web of the other.  This is the result:

This wasn't half bad, but the "bricks" looked more weathered and rounded, like rough stones.  The girder rail looked okay but again was too large and urban for my early 'teens setting.  This technique was also a lot of work and my carpal tunnel nerves were not happy after just this small test piece!  So, I ordered a 3D printed brick roller from Rail-N-Scale on Shapeways.  Here is the result of that first test (you may want to open link in a new tab for a better view):

MUCH finer detail; almost too fine, but I'd rather err in that direction than to be too chunky.  No special rail needed - this is code 83 flex.  Using the tool as it came from the maker was awkward, so I followed Martin's (Marklin of Sweden) advice and made a roller arm.  I used a cheap detail paint roller from the hardware store, all of $3.00.  The smaller roller with the ridges is for street track while the wider one on the handle is for making plain brick texture.

While the DAS clay comes in a nice terra cotta color, I wanted a dark, over-fired red and blue-black color scheme for the bricks based on existing historic brick streets in Florida.  Google "The Old Brick Road" and you'll see a surviving example of an early Florida highway.  Here's what I came up with on my test sample:

And here's how it looked on the diorama after all the scenery was in place.  There's a defined edge but as you can see, the dusty sand has found its way up onto the street in places, especially at the intersection with the dirt road.  This image was not submitted to the contest primarily because of the background - the street just drops off into nothing behind the streetcar.  However, note the camber of the road - something that would have been very challenging to do with styrene sheet or other brick textured material.

Final thoughts on the tool and technique; the tool is worth it but it takes practice to use and patience to let the clay rest before texturing.  The fine texture means mistakes such as drifting or over-marking the texture aren't as visible unless you look closely or the light catches the brick detail just right.  Will I use this tool again?  Absolutely.  There is no finer-scale brick texture out there unless you're willing to draw your own and have it laser cut (as Tim Warris did for his Bronx Terminal).  In fact, it has me rethinking the paving on my Pine Branch Park street scenes.

Thanks for reading, and feel free to share this article.