Search This Blog

Showing posts with label ocalicreek. Show all posts

Sunday, February 18, 2024

Drug Store Saga, Part III

Here's the belated but as-promised continuation of the Scale Structures Limited Drug Store project.  Let's start around back:

 
The windows and doors in this image are merely set in place for now to avoid dings while heavier construction continues.  The vertical gaps will be covered by drain pipes with scuppers near the top and the horizontal line will be hidden by a wide sign attached to the wall.  In this way the wall can remain removable to access wiring and details inside the building's second and third floors.  I had thought I might use magnets to hold the wall in place but a simpler solution will be sticky wax or even double sided tape.  Below, the view with wall removed:

Access granted.  You may proceed with detailing.


The above image shows the structure from beneath being braced before the brick had been applied.  I have since broken one joint in order to "straighten" one wall.  Just like real house construction, there's no such thing as a truly straight wall.  Everything must be shimmed and even then it doesn't quite make it true, plumb or square but in the end it looks pretty good.  More on shimming and imperfection in the next post where I discuss the fancy trim. <shudder>.

I'll close this post with an image I shared on Instagram recently.  I'm quite happy with how this little bar turned out.  The actual serving counter is complete as well but isn't shown here.  Still need to make bar stools and a display stand for the middle of the room but otherwise the detailing for the interior is coming along nicely.  Oh and of course it needs paint - that should go without saying but I'll mention it to be clear.  Probably a wood stain, but we'll see.


Wednesday, December 27, 2023

Drug Store Saga, Part 1

I'm calling this a Saga right at the get-go because I can already tell it's going to be one of those builds.  The drug store in the title is the Scale Structures Limited Corner Drug Store.  A classic structure, to be sure, but the model is not without its flaws.  Even on its release in 1972 the folks at Model Railroader took note of how the angles of the bay walls don't match the angle of the ornate wall cap casting.  (More on that later.)  However they also noted one of the kit's strengths; the construction allows for easy rearranging of the walls.

Early in the process, before the fitting frustration set in.

In that regard I have taken things one step beyond.  The space intended for this structure in Ocala Springs is located on an intersection and bounded by a spur at the rear and the next building down the block.  I've got leeway down the block as that next building hasn't been decided yet.  But between the street and the spur I can only go so far.  However, the problem was not that the building was too wide, rather it was too narrow.  I envisioned an alley between the building and the spur, but this space was large enough to shoehorn in another structure.

The solution was to lop off some of the long end of the drug store and glom it onto the shorter side.  Now my structure is a bit more squarish.  Careful measuring meant the window openings could be kept evenly spaced without trimming and the surgery was relatively painless.  But I'm making it sound all too easy.  Before I even reached this point I had struggled with the aforementioned angle difficulty, and realized another aspect the folks at MR noted; the need to carefully read the instructions (many times).  

Note the original rectangular "floor" set onto the roof of my reconfigured structure

This freedom and flexibility in construction means the kit doesn't drop together in a simple sequence of tabs and slots.  The stiffeners inside the structure are the floors.  To begin with I cut new ones from thicker card as I couldn't see the thin stuff provided doing a good job for the long haul, even sprayed with sanding sealer.  This allowed me to correct the issue with the bay wall angles.  You are instructed to measure and mark the floor levels.  The plans give you an indication of where the first floor goes, and the roof along one wall, but not the others.  

And you're instructed to build the thing "upside down", aligning walls from the top.  That's fine for the front walls and bay, but not the back walls which are two different heights.  Add to that the challenge of a too-small wall and laying out the floors gets confusing quickly.  This tiny wall is some sort of mistake, a wrong part.  At first I thought it was N scale but a quick examination with my scale rule checked against the plans and no, I have no idea what this shrunken wall is.  I didn't lose sleep over it but, using the plans, I was able to fabricate a new one which is fine since I had planned to move that wall's windows to a different wall.

"Shrinky Dink" wall in the center, replacement on the left, relocated windows on the right. And all this before I decided to reconfigure the walls.

To recap at this point; building the original kit as instructed is already challenging and then I had to go and make it even more so.  But the problem became the solution.  I don't have a set of precast plastic walls that don't fit, I have cardstock.  Cardstock can be easily replaced.  The card in the kit for the die-cut walls appears to be good quality material.  It cuts cleanly and sands well.  No watermarks but I'd suspect a quality similar to Crescent or Strathmore board.  

This post has already gone far too long so I'll save the tribulations of working with the castings and printed wall textures for another part.  Thanks for reading.

Tuesday, August 15, 2023

Pictures I Didn't Submit

Here are a few shots taken during the construction of my entry into the Walthers National Model Railroad Build Off contest for 2023.  These didn't make the cut.  I'll say more in the captions.

Doesn't everyone wash their walls?  This was to try and scrub away the tape residue from the window panes.  Yes, I masked every single window pane in order paint the bright blue windows white.  Because they're cast as one molded piece - clear, blue and white all together.  Who thought that was a good idea?

Fans of the 90s comedy "Frasier" may recognize this coffee mug.  My folks bought it for me at a yard sale, not knowing the connection to the show.  Neither did I until a fan pointed it out to me.  I use it nearly every Sunday.

This was the point in the process where I was considering a printed backdrop.  Didn't go that route, but was inspired by the imagery to model two Bald Cypress trees on the diorama.

And here are those Cypress trees being constructed outside, because my family couldn't stand the aroma of the super glue kicker.  Woodland Scenics tall columnar pines made a great trunk and armature.

The NMRBO Hurricane.  My workbench in the throes of scenic application.

My son Andrew was a great help setting up the photoshoots and used this opportunity to take some images of his own.  And I thought my hair was long when I was in high school.


Sunday, July 9, 2023

Details and Story Telling - NMRBO23

While this year's diorama for the National Model Railroad Build Off was designed with a broader picture and clear 'front' view in mind, there was still great emphasis placed on detailed scenes that contribute to the overall story.  That narrative is one of leisure in the "winter paradise" that was Florida of the 1920s, when tourists flocked to the state to escape the cold snowy north and play in the sun.  Of course there were residents there too and they found ways to relax and enjoy the day.  Below are some close-ups of scenes that tell the story:


Most of this year's figures were already painted, including the garden gnomes - accurate for the 1920s, actually - but I did paint a few figures and details.  I also built three vehicles, two from Jordan Miniatures and one from Sylvan, confusingly a 'Jordan' roadster.  I'm most pleased with finding a new job for Ma Spumoni; instead of hanging laundry she's picking oranges.  The fellow in the rowboat was originally going to be fishing.  Before that the rowboat was going to be a scratchbuilt steam launch or pleasure craft such as would be seen at that time.  But time ran out for adding more, and space got compressed at the waterfront so the steam launch was replaced with the rowboat, a metal casting.  The man snoozing in the boat was marketed as a 'hobo' but in this case he's just a fellow out relaxing on the water...for the moment.


Sunday, July 2, 2023

Diorama Design and Composition - NMRBO23


Click on the image above or open in a new tab to see a really large version.

The top-down image above offer a good view of the overall layout of this year's National Model Railroad Build Off diorama.  The main idea driving the design is the flow across the scene from side to side, primarily left to right, interrupted by elements that break that flow.  Elements that run from one short side to the other are the lakefront, the track and the road.  Elements that interrupt that motion are the bends in the road, the stream and bridges crossing it, and the trees.  The houses and larger trees at the back of the scene are adjacent to or behind these longer, sweeping elements, and are almost interesting background features in and of themselves.  More on them in a moment.

Let's start with the water.  Since Woodland Scenics Deep Pour Murky water and a plate girder bridge were two required elements in the product bundle, it made sense to make them primary features in the design.  I placed the bridge front and center with the water making a V towards the bridge.  The small 'surface rocks', also required, point along that V toward the bridge.  (Another line of surface rocks points toward the concrete arched bridge, but it is secondary to the railroad bridge and serves another compositional purpose).

The last required element in the product bundle was "Aunt Lucy's House", a two-story wood house kit by Walthers, (nee Faller).  This structure might get its own blog post, as there's much to talk about there, but the topic for this post is about how to use the design of the diorama to highlight the required elements.  To draw the eye to Aunt Lucy's house I put a bend in the road and placed the big white house at the end of it.  I then put parallel elements in front of it which reinforce its location, connecting the street to the track to the fence to the driveway and finally the roof of the house; there's even a line of surface rocks between the track and the fence.  See the blue lines in this image below:

Note also how the other house on the left relates to the curving road, track and lakeside over against the strong parallel lines at the farmhouse.  In "reality" the home would have been the last thing built - the lake being there first, the track coming next, the road after that, and then the house.  But for the purposes of the design composition it is the most eye-catching large element on that side of the diorama, and the shape of the elements in front serve to reinforce its location.

As I implied in last year's analysis of my diorama entry from 2022, balance is important.  The weight of things influences how the viewer sees the scene.  So far the discussion has focused on a top-down view, but this year I added more vertical gradients to the diorama.  The lowest elevation is the lakefront and stream, and the highest the ground level under the mission-style bungalow on the left.  However the tallest structure is still the white farmhouse.  The paved road is the only leading line that changes elevation; it is above the track on the left, level at the crossing, then below it on the right.

Finally the trees play an important composition role.  There is one more (broken) horizontal line on the diorama - the trees across the back.  I had originally planned to include a printed backdrop but decided late in the construction to omit it.  I had even considered using a small mirror to give the illusion that the stream extended back further into the distance but disguising it with a tunnel of trees would have changed the overall feel and balance of the diorama, putting too much weight in the center instead of out front on the bridge.  

I firmly believe that nature, whenever appropriate, should dominate our modeled environments.  Big trees should be big, maintaining the relationship to other structures, trains, people, etc. as they do in reality.  My Bald Cypress trees are 60-70 feet high; this is about average for this species, but still tall enough to cast a long shadow over their surroundings as a model.  

The palm trees dotted throughout are mainly there to set the locale but also serve as punctuation marks, places to interrupt the flow and keep the eye in the scene a bit longer.  As painter Ian Roberts notes, strong lines across a composition tend to take the viewer outside the scene, so elements that keep the viewer in the scene need to be placed to do just that.  It would be easy to follow the paved road right off the right side of the diorama, but that big Cypress says "Stop!" and keeps your eye at the lakeside "beach".

Thanks for keeping your eye on this longer blog post.  I hope these thoughts inspire you to consider design and composition in your modeled worlds.


Thursday, June 29, 2023

National Model Railroad Build Off 2023 Diorama

Here are some images of the diorama I built for the Walthers National Model Railroad Build Off this year.  Click on each image or open in a new tab to see them larger.


This year I chose to depict a lakeside setting in north-central Florida in the 1920s.  Most of the folks on the diorama are having fun or engaged in other leisure activities.  I say "north-central" Florida due to the inclusion of surface rocks, an element required by the product bundle I purchased for the contest.  These are rare in the state, but limestone outcrops do show up here and there.  The other elements were the big white farmhouse, some Woodland Scenics Deep Pour Murky water and a short plate girder bridge.  I also chose to include Walthers' Mission Style Bungalow and to kitbash a Rix overpass into a concrete arched bridge.

The hardest part of this year's diorama wasn't building the thing, but photographing it.  I tried three locations before arriving in the driveway using the neighbor's landscaping as a backdrop.  I was most pleased with seeing the diorama in full sun, but the sticky wax I used to hold some figures in place didn't like it, nor did some old decals I applied to the Jordan mail truck.  

I think this will be the final diorama I build for this contest unless there's a bundle I just can't pass up next year.  While I enjoyed the last four months of model making, I've got bigger ideas for the Pine Branch Park railroad and would rather put my energy there.  Plus, I've been enjoying painting minis and playing Star Wars Legion at my local gaming store.  I've got a few tubs of assorted bits I've been collecting that will become terrain pieces for that game.  But the biggest draw right now is the desire to rebuild old rolling stock and get some vintage trains Back on Track.  The weather around here is just beginning to heat up so it is time to stay inside and build models.

More posts on the diorama will appear eventually.  Details, design, and other thoughts.  Thanks for reading.


Monday, April 3, 2023

Diorama In Progress

After some consideration, I decided to enter the Walthers National Model Railroad Build Off 2023.  Here are a few "teaser" images from this year's diorama so far:


I'm really enjoying building this year's diorama.  This time there are two main buildings and two bridges, one long stretch of track, a road and a lakeside scene, with plenty of trees to build and many opportunities for detailed scenes.  Last year I included several craftsman kits but this year the structures are almost all plastic and all built as intended...mostly.  Of course I have to make upgrades.  Once again the setting is Florida but the era is the late 20's or early 30's instead of 1914.  I'm pleased with how the overall composition is laid out and steadily working to bring it to life.  

I don't want to give away too much too soon so I may not share much more than this until after the diorama is complete and the contest deadline has passed.  But there may be a handful of other posts...we'll see.  Once again I'm reminded of what I consider one of the main benefits of this contest; the ability to complete eight square feet of fully-scenicked model railroad in a short period of time.  I think it's time we lay to rest that tired old trope, "model railroads are never finished", don't you?


Thursday, August 11, 2022

Cable Car Conversion

This post is the fourth in the series about how I built my Walthers National Model Railroad Build Off diorama.  In the first post I described how I made the brick street.  Next I discussed the thought process behind kitbashing a vintage plastic kit.  Last week I talked about some of the lessons I learned designing and composing the diorama itself.  This time I'm going to show how I kitbashed a Bachmann Cable Car into a horse-drawn streetcar.  

Here's the cable car during deconstruction and conversion.  I've been to San Francisco many times and I rode the cable cars years ago.  On a more recent trip my wife and I spent more time riding the buses, but I digress.  Next is a photo of the initial reconstruction.

In the above image the roof has been shortened and tacked together and the ends are being modified.  The donor car is, admittedly, pretty cheap but I think it has great potential.  They can be found on eBay or at train shows for a decent price.  Originally I planned to build a streetcar as a decomsissioned vehicle now placed as a tourist attraction at Strickland's Store on my late 20s era Pine Branch Park layout.  This is, ultimately, where this model will end up.  But for this diorama it needed to be in service.

The body shell has been given a coat of primer and the gaps from the roof reduction filled with putty and wet sanded.  The frame was scratchbuilt from styrene with end plates and railings in brass, soldered.  The bearings came from a Selley old-time passenger truck and the wheels are O scale spoked speeder wheels from Wiseman Model Services drilled to accept the axles from the Selley wheelsets.  The horse is a heavy metal casting, probably lead, of what I think is a circus horse; see the pointy thing between his ears.  This was carefully filed away and the head reshaped.

Here is a prototype picture I found.  There are many designs for streetcar bodies and most are similar, resembling a short coach body with clerestory roof and open platforms.  This particular prototype matches very closely the Bachmann cable car body, right down to the gentle arches in the windows.  Had I not been pressed for time, I may have modeled more of the lovely detail on the end platform railing and panel.  Mine is far simpler but still conveys the essence of the thing.

Lettering was done mostly one letter at a time using an alphabet sheet from K4 decals.  I chose Orange Avenue because it fit neatly using the yellow letters I had and helped set the scene in Florida.  The paint scheme was chosen after looking at several preserved horse drawn streetcars.  Yellow and brown seemed to be a popular combination, and the Tuscan Red roof is a classic choice.  I painted the horse as a big Palomino draft horse.  I already had dark brown and medium brown horses and a gray mule on the diorama, so it seemed a good choice.  

The tackle was mostly cast onto the horse but the reins are made from black electrical tape.  The swingle tree was scratchbuilt from styrene and wire with scale chain superglued into an arc behind it.  These bits are fiddly but the result is worth it in terms of realism and a fine scale look.  The driver is a Weston figure and the passengers are two seated townspeople from the Lytler & Lytler Ragtimers series.  The car body is removable to allow access to the interior.

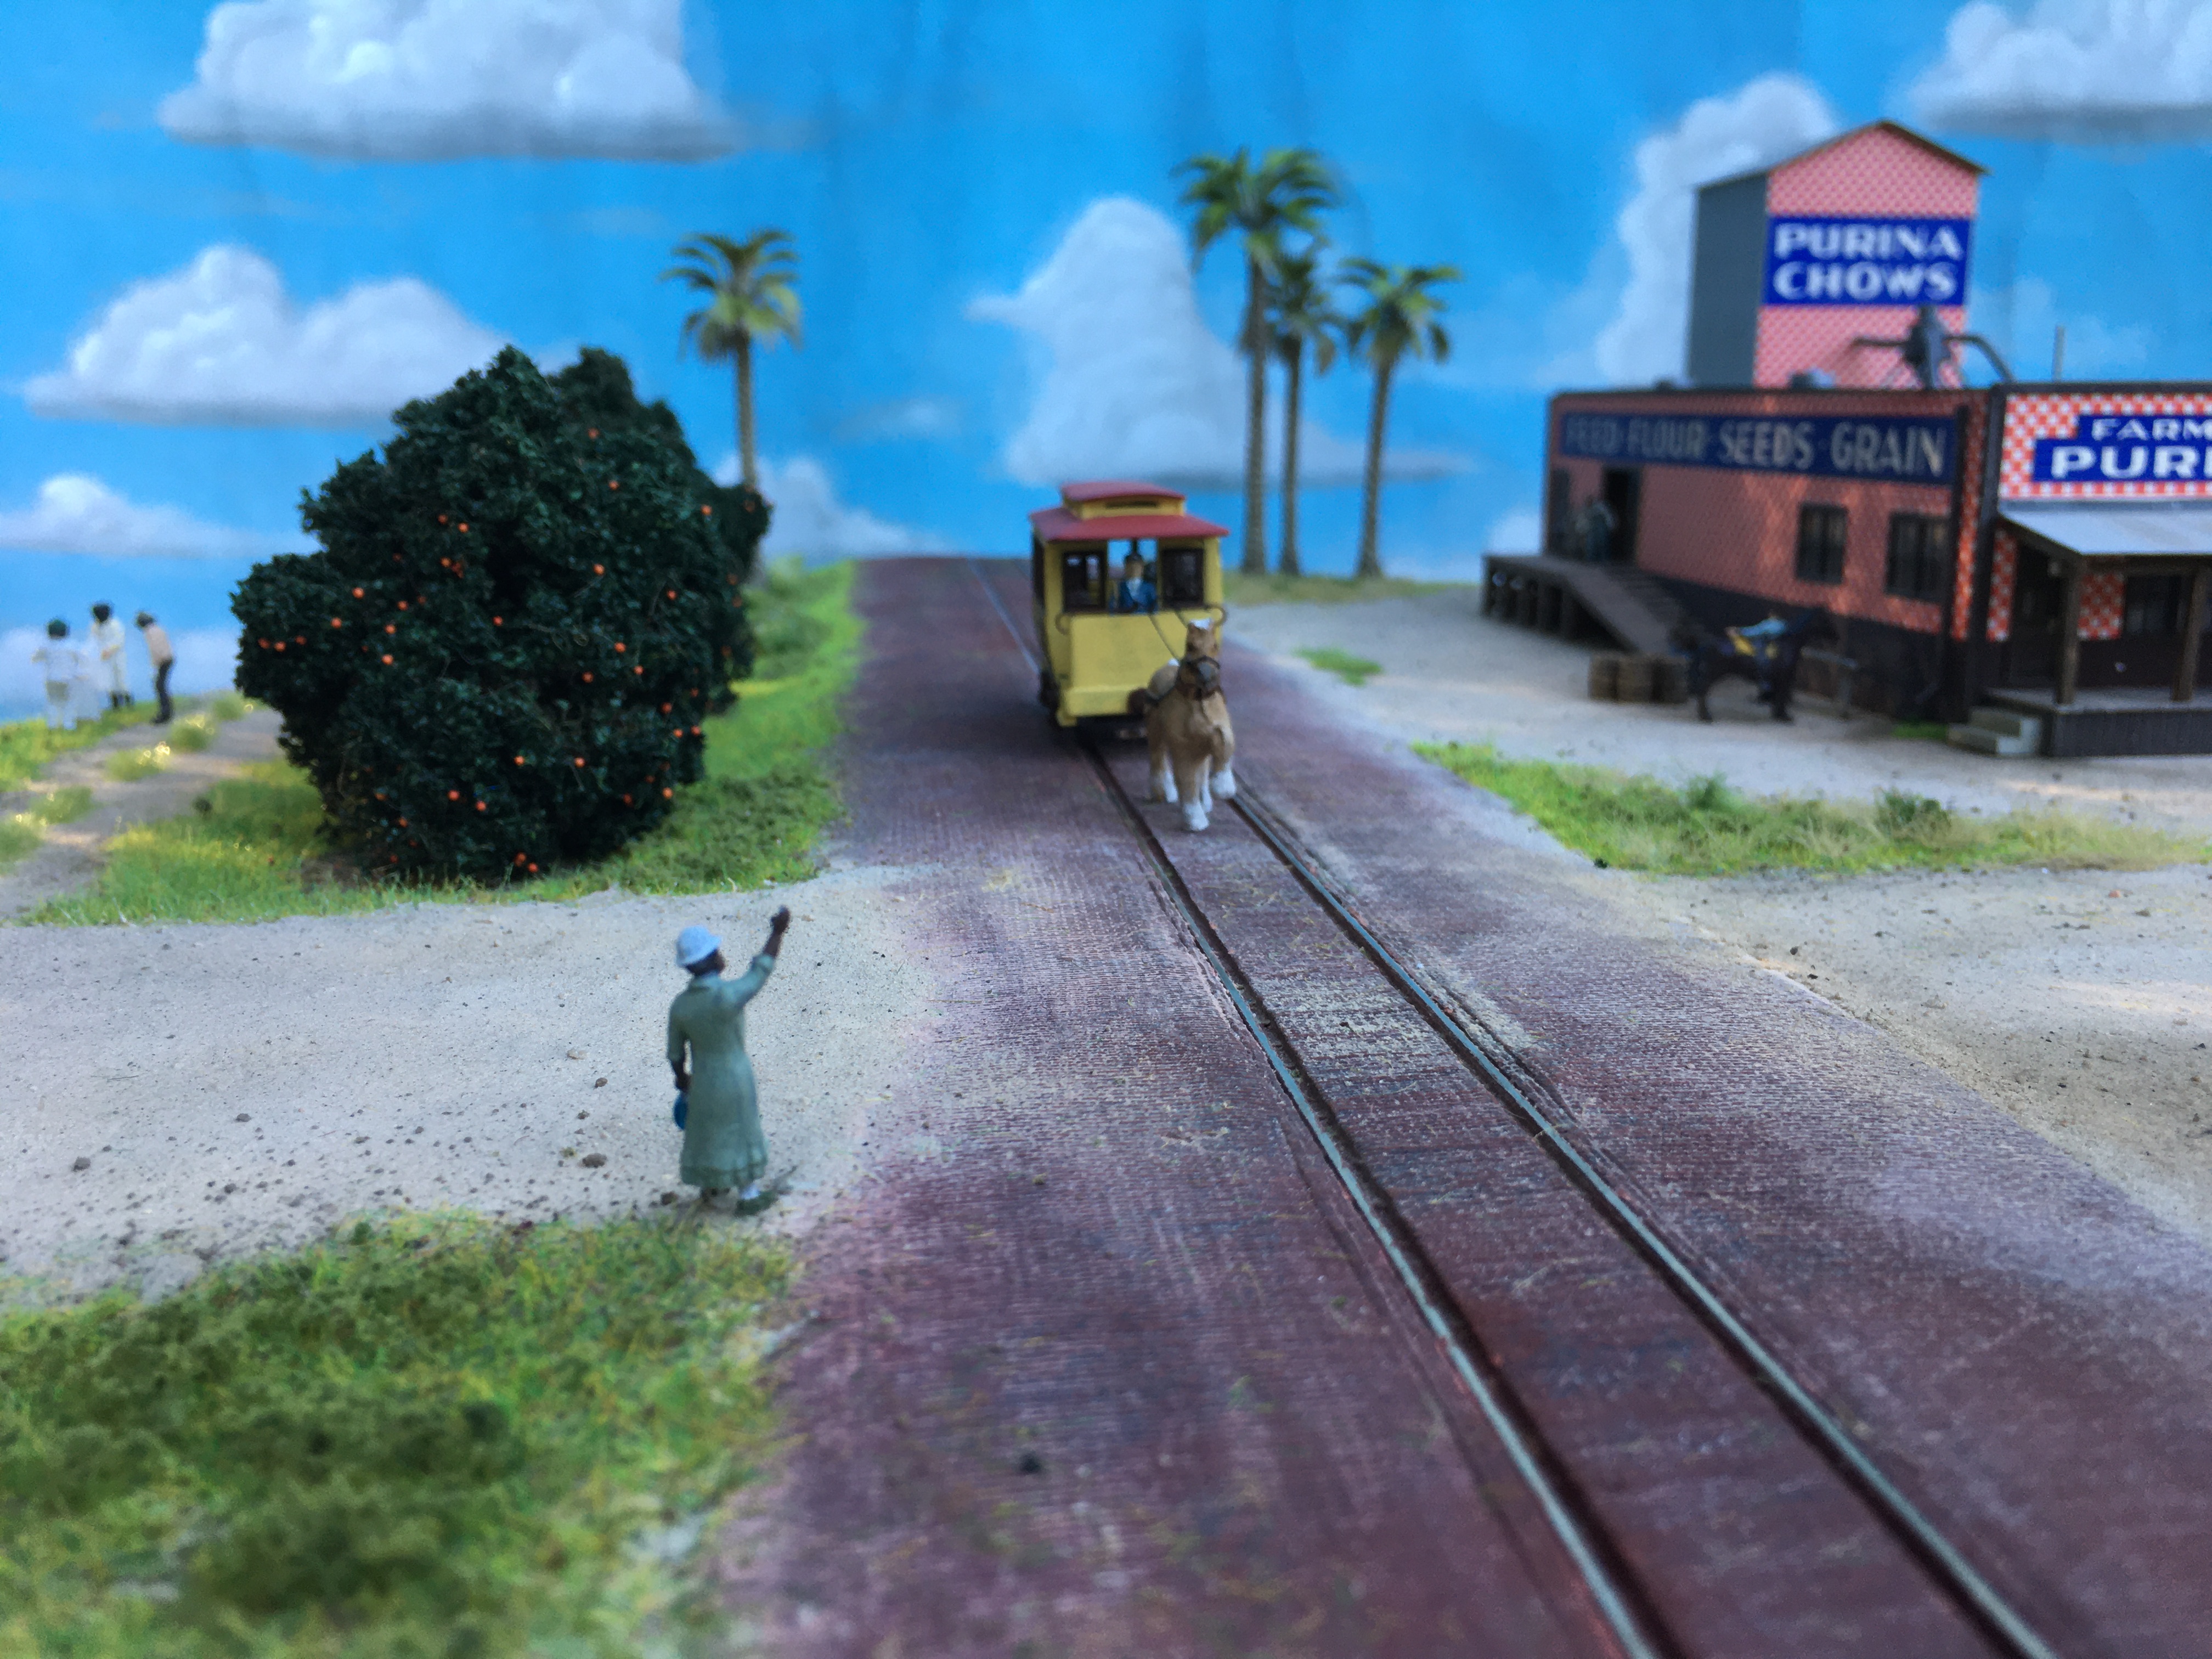
This last image sets the streetcar into the story.  The woman hailing the car is from Preiser.  I didn't submit this shot due to the obvious wrinkles in the sky, the poor lighting, and lack of focus at various depths.  Still, I like it for the story it tells.  Three mini-scenes are visible in this one shot, and they will be the subject of a future post.  I had a great time kitbashing this little car and using it to paint a picture of life at the turn of the previous century.

As always, thanks for reading, and feel free to leave your comments and questions in the field below.


Thursday, August 4, 2022

Lessons Learned

In this post I'll share a few lessons I learned from building a diorama for the Walthers National Model Railroad Build Off contest.  While building a diorama may seem like a simple, straight forward thing to do, it really challenged me to think differently.  The process also made me realize a few things about myself and my approach to the hobby; beliefs I had held but never clarified into solid ideas. 

This is a BIG image if you'll click on it, then open the picture in a new tab for the full size.

First off, this diorama taught me that I could fully scenic a 2'x4' space in only four months, from ground cover to scratchbuilt trees, four feet of brick street, two feet of hand-laid track, three craftsman structure kits, a kitbashed structure, a Jordan vehicle, a kitbashed streetcar and numerous figures, all hand painted.  My current model railroad is only 4'x6' - that's just three times the area of the diorama.  Plus, the Purina Mill, Strickland's store, streetcar, billboard and orange grove all have spots already marked out on the railroad once I decommission this diorama.  If I were to work at half the pace I did to get this diorama done, I could have the Pine Branch Park railroad scenicked in two years or less, to a very high standard of detail and realism.*

Four feet wide

In this contest the focus was strictly on two parameters as defined by the rules; creativity and skill.  I set out to tell a story about a place in central Florida in 1914.  My model railroad has a similar goal, but is set in the late 1920s and includes operating trains as part of the storytelling.  Both use creativity and skill, but the diorama is a more limited setting.  Instead of operating the trains to provide action that tells the story, the setting itself has to do that task.

Why is this man sleeping behind this sign?  Some stories raise questions.

In truth our models, apart from the ones that move, all face the same challenge; how to imply action without motion.  While building my horse-drawn streetcar I realized one possible reason for why more folks don't model this mode of transport; it can't be made to move realistically.  A powered streetcar pushing a lifeless horse down the street would look odd, yes?  Some modelers don't like to use figures that are in an "action" pose, as if time is frozen, because it looks strange next to a train that does move.  On a diorama with no moving trains this matters less, if at all.

Is this a train?

Another challenge I faced was whether or not to use a backdrop.  Modules or home layouts often include a backdrop and the Walthers contest did not require one.  However, the contest submission form called for photos of the "front", "left" and "right" sides of the diorama.  Oh.  I hadn't considered front or back, left or right when planning the scenes.  It was a diorama to be viewed from any angle, and engaged with by the viewer from any direction.  This arrangement made it difficult for me to designate a "front" of the diorama. 

You can't see this from the front.

As someone with an "island" style railroad (see more about that here) I've always built structures with an eye to how they'll look when viewed from all sides.  On a layout where the views are controlled structures and other scenic elements can be built to take advantage of that, omitting back walls for example, or only detailing what will be seen.  On my diorama different views and vistas would open or close as the viewer moved around the scene.  This is how I had begun to imagine the elements on my layout so naturally it is how I placed these elements on the diorama and why all sides received some level of detail as appropriate for the scene.

Did my design choices hurt my chance of winning the contest?  Perhaps.  Most of the entries that made the final cut were pretty clearly arranged with a defined front and back, though not all.  What about the railroad elements?  None were required for the contest, technically, though a train did need to be shown in the final photos.  I think a horse-drawn streetcar is a train and though I had no freight car on my spur at the feed mill, one of the finalist entries showed no train at all.  And the era?  Or locale?  Perhaps.  Very few folks model Florida and nobody I've seen models Florida in the teens or twenties.  This is new territory in our hobby, and sometimes the familiar scene will win out over the unfamiliar.

Figure provided for scale. ;)

Would I do it differently if I were to enter again?  Maybe...or maybe not.  My design choices were deliberate even though I wasn't fully conscious of all the assumptions influencing my choices.  A viewer can't see it all from any one angle, just like real life.  It tells a story through the composition of elements and placement of details.  The setting is unique and hasn't really been explored before.  It demonstrates skill and creativity.  But most of all I'm happy with the diorama I built - it makes me smile whenever I look at it. 

Thanks for reading - feel free to comment below or ask questions.


*Completing the current model railroad will likely take longer than two years.  As of this writing I'm still unpacking boxes and sorting my garage, and won't be doing any more work on the railroad in situ until I know the roof won't leak and rats won't be chewing the scenery.  I'll be following Bruce and Janet Chubb's example from their early modeling days, building models at the kitchen table until the train room is ready.

Tuesday, July 19, 2022

Old Florida Brick Street

This post is the first of several detailing how I built my diorama for the Walthers National Model Railroad Build Off 2022 (nmrbo22 in the tags).  In this installment, I show how I built the brick street.

When I decided that I needed to have a brick street on my diorama I began searching for options on how to make one.  Walthers sells a plastic kit with injection-molded segments that looks pretty good, but then you've got to deal with section joints - not impossible, but not how I wanted to go.  Also, it's pretty hard to get the crown of the street looking realistic.  Brick texture sheets in plastic and laser-cut material are also available but present similar challenges.

Here's a prototype image of the look I was going for.  This image in general was a great source of inspiration for the overall look of the diorama, with a streetcar track added of course:

Finding no ready-made solution, I looked into making my own.  First I tried hand-embossing brick using a paintbrush ferrule with the bristles removed and bent into a crude rectangle.  The material is DAS clay and the girder rail is simply two rails with one laid sideways up against the web of the other.  This is the result:

This wasn't half bad, but the "bricks" looked more weathered and rounded, like rough stones.  The girder rail looked okay but again was too large and urban for my early 'teens setting.  This technique was also a lot of work and my carpal tunnel nerves were not happy after just this small test piece!  So, I ordered a 3D printed brick roller from Rail-N-Scale on Shapeways.  Here is the result of that first test (you may want to open link in a new tab for a better view):

MUCH finer detail; almost too fine, but I'd rather err in that direction than to be too chunky.  No special rail needed - this is code 83 flex.  Using the tool as it came from the maker was awkward, so I followed Martin's (Marklin of Sweden) advice and made a roller arm.  I used a cheap detail paint roller from the hardware store, all of $3.00.  The smaller roller with the ridges is for street track while the wider one on the handle is for making plain brick texture.

While the DAS clay comes in a nice terra cotta color, I wanted a dark, over-fired red and blue-black color scheme for the bricks based on existing historic brick streets in Florida.  Google "The Old Brick Road" and you'll see a surviving example of an early Florida highway.  Here's what I came up with on my test sample:

And here's how it looked on the diorama after all the scenery was in place.  There's a defined edge but as you can see, the dusty sand has found its way up onto the street in places, especially at the intersection with the dirt road.  This image was not submitted to the contest primarily because of the background - the street just drops off into nothing behind the streetcar.  However, note the camber of the road - something that would have been very challenging to do with styrene sheet or other brick textured material.

Final thoughts on the tool and technique; the tool is worth it but it takes practice to use and patience to let the clay rest before texturing.  The fine texture means mistakes such as drifting or over-marking the texture aren't as visible unless you look closely or the light catches the brick detail just right.  Will I use this tool again?  Absolutely.  There is no finer-scale brick texture out there unless you're willing to draw your own and have it laser cut (as Tim Warris did for his Bronx Terminal).  In fact, it has me rethinking the paving on my Pine Branch Park street scenes.

Thanks for reading, and feel free to share this article.