Search This Blog

Sunday, November 14, 2021

Pet Cemetery Project 2021

Model Railroading has taken a back seat lately to a few pleasant distractions.  A surprise visit from in-laws led to a flurry of overdue cleaning and straightening, a late honey harvest needed to be bottled with wax to clean and process, and most enjoyable of all, my oldest son and I returned to the annual work of building tombstones for our family Pet Cemetery.  


The core of the tombstones shown in the photos above were given to me by a neighbor in Washington State.  He used to set up a big graveyard in his lawn each September for Halloween.  Yes, he started setting up a month early since he didn't get around so easily and he had that many props.  People used to come from all over to see it.  Naturally we had to get into the business as well, so rather than compete with another human graveyard, we chose to plant a Pet Cemetery.

Being a kitbasher at heart, I can't just plunk down any old pre-made prop.  Where's the fun in that?  So, I take the pre-made foam stone and add bulk to increase the thickness.  Sometimes I'll carve away parts to change the shape, as in the first picture, or I'll add more to widen it or create a thicker base.  For larger stones I'll insert PVC pipe into the base so the stone can slip over rebar, or drill holes in a wooden base to pin it to the ground with 12" ground nails.  

Once the rough construction is done we will mix a batch of paper mache' clay following Scott Stoll's recipe (www.stolloween.com) and begin applying it all over, taking care to maintain the pre-carved details we want to keep.  In the past we've carved letters into the face.  This year, however, I purchased some plastic fridge-magnet letters from a local thrift store which we hot-glued to the stones (not seen in the photos).  They'll be covered with the paper mache' mix, minus the paper.  When all that's dry, after any carving, the stones are painted and sealed.

Unfortunately due to the other aforementioned events, the construction of our two stones we planned to add this year was delayed.  Still, we set up the cemetery at our church for the second-annual COVID Halloween drive-thru.  Right now we're still applying the paper mache' coating, with carving and painting yet to come.  Maybe by Christmas they'll be done.  It is not a quick process, taking about a month from start to finish working a little each evening a few times a week.  That's fine, as it is good father-son craft time and the resulting object becomes a memorial to those good times.

Thursday, November 4, 2021

Attaboy Culture

This is an opinion piece.  A long one, and one that may run against the grain for some readers.

I have grown weary of model railroad forums for a variety of reasons.  Today's post will focus on one which has been termed, "Attaboy Culture"*  This term comes from the title of an article on the "Doog's Models"site.  In a nutshell, the author points out that often when a modeler shares their efforts in an online forum, that effort - no matter how well or poorly executed - is rewarded with a string of compliments, often gushing praise.  Any attempt to offer a suggestion that smells the least bit like a criticism, constructive or otherwise, is itself criticized by the crowd who had offered the praise.

While the article I referenced does a fine job of describing the phenomenon, I think there's more to be said.  The author doesn't mention YouTube but I've seen it there too.  Model builders, makers, and creative artists will share a video - often well made - about their latest creation, er, sometimes well made.  The comments are filled with Attaboys, and these are often "liked" by the video's creator.  But dare to ask a question that challenges the maker, and at the least you won't get a like, and at worst, the crowd of adoring fans will heap scorn on you or report you to YouTube for bad behavior.

What irks me about the Attaboy Culture in model railroad forums is perhaps a trifling thing to some.  I would check in regularly on a thread about what promised to be an interesting project.  There might be twenty new posts since I'd last checked.  One post would show a couple pictures and some description of the actual project.  The other nineteen would be Attaboys.  Any legitimate questions about technique might get lost in the chorus - and they often do.  Complex build threads might be dozens of pages long, but the real model-building content could be condensed to two or three without the Attaboys and general chatting, often off-topic (but that's another topic altogether).

However, what really worries me the most are the potential long-term effects this culture will have on our modeling community.  Seems to me there was a time when the general assumption among model builders was that a person wanted to improve their skills.  Hobby magazines promoted this ideal in editorials and the NMRA developed the achievement program to challenge modelers to grow in all areas of the hobby including authorship and volunteering, both of which were opportunities in themselves to promote the hobby and share your knowledge.

While those early hobby magazines included how-to articles from skilled people, perhaps even experts in a given technique or area, they also showed photos submitted by folks whose skills weren't well developed.  The assumption seemed to be, "start where you are - and good for you for starting! - but here's how you can do better, and doing better is a satisfying and integral part of this hobby".  You didn't have to be the greatest modeler, with years of experience, to share a photo of your work.  However, to author a how-to, you needed some experience.

I see YouTube videos and project threads on hobby forums in which the work displayed makes it very clear the person is a novice, perhaps even doing a technique for the first time.  Good for them.  Nobody is born with the ability to weather a boxcar or build a tree; we all have to start somewhere.  But these mediocre efforts are often met with that rousing chorus of Attaboys and lauded as if they were the greatest modeling ever.  So what happens when a really experienced modeler shares their effort?  Often the same thing.  This creates a false equivalence that reduces the hobby to a popularity contest.

When a magazine published an article or a photo, there was a vetting process.  Photos that showed a work-in-progress or a beginner's effort were described as such, and rarely was a feature article printed that showcased the work of a rank newbie unless some exceptional talent was on display.  Attaboys, such as they were, came a month later in the form of a letter to the editor that the magazine chose to publish often alongside a criticism of the same work.  These were clearly opinions, found in the editorial section of the publication.  Often there were questions that had been submitted about the article, and the author's reply would be shared alongside.

But today, thanks to the internet, anyone of any skill level can share their work, and comments can appear immediately.  Some unscrupulous types on YouTube make no effort to say they're beginners, instead relying on slick video production techniques and snazzy graphics to give the impression that they've been at this for years and what you're seeing is the product of experience.  If you have the actual experience you can spot their lack thereof, but if you don't, well, then you can see why their channel has over a million subscribers.  On a platform whose algorithms reward clicks and likes, well-produced videos, regardless of the content, often beat out the poorly filmed video even if the content is superior.

I can learn from anyone, whether they're a beginner or the world's leading authority on the subject.  Often I'll read an article or watch a video and perk up at one line that made the whole thing worth reading or watching.  But many times I'll cringe as the builder makes a rookie mistake that instantly reveals their skill level.  That's not the problem.  This essay is about Attaboys.  The problem is when this creator makes no effort to acknowledge their lack of experience, and passes themselves off as an expert or hides behind fancy editing to entertain the viewers.  Clicks and Likes.  Attaboys.  Serious questions ignored.  Suggestions for improvement criticized.

In one of Allen Keller's Great Model Railroads videos, George Selios recalls an incident with a publisher of a major hobby magazine.  They were hesitant to publish more articles about his Franklin and South Manchester railroad.  Why?  According to George, they felt like his work was too intimidating.  George's reply?  Nonsense!  People want to be inspired by good modeling, by excellence, and to have something to aspire to.  Clearly the hobby press was headed a different direction.

Has this hobby become anemic?  Are the seasoned veterans being replaced by ranks of novices?  Not yet, though that day may yet come.  So many fine modelers are aging, and haven't made the effort to become authors or make quality videos, to share their knowledge.  The NMRA is continuing to age and shrink in numbers and while the pandemic has brought many regional gatherings online, bringing many hidden gems and beautiful railroads to the public eye for the first time, the quality of the videography is less than stellar, and often serves to highlight the reasons why many younger modelers have opted to avoid the NMRA.

Fortunately, I still see fantastic work being done and shared in forums and videos.  There are newer modelers demonstrating skills from new technologies like 3D printing to scratchbuilding massive structures from cardstock (in N scale, no less!).  There are more experienced model builders blogging and making good quality videos.  The internet is still a young, adolescent medium, compared to published printed magazines, and can resemble a wild west boomtown at times.  Hopefully as it matures, this Attaboy Culture will take a backseat to a more meaningful interaction between modelers, new and old.

If you made it this far, thanks for reading.

*see this post for more.  I endorse the ideas, but not the profanity.

Thursday, October 28, 2021

An Iffy Idea

In the most recent issue (October 2021) of Model Railroad Hobbyist there's a mention of a new structure kit from Frenchman River Model Works.  What caught my eye was the name of the kit's designer, "Thomas Yorke", as his structures are well known in craftsman kit circles for being little works of art, in a funky, dilapidated sort of way.  I'd also purchased items from Frenchman River before and have been pleased, so I clicked on the link to see this new little building.  Little did I know what a rabbit hole I'd fallen into.  Here's a link to the structure:

http://frenchmanriver.com/HO-187-Scale-Iffy-Tire_p_452.html

Now the ad in MRH mentioned that this was based on a structure in Colorado.  I was puzzled to read Yorke's description on the Frenchman River site where he mentioned that the name came from a place in Georgia.  The model is typical Yorke, with exposed brick and crumbling stucco, as you'd expect if you're familiar with his work.  That's a good thing, in my opinion.  However, I think there's a missed opportunity here.  Yorke called the place from which he borrowed the name, "too pedestrian".  Now I had to see for myself.

A quick Google search revealed the address, 5100 Buford Highway in Norcross, Georgia.  Google Earth provided a chance to explore from the street view as well as from above.  Both views are...interesting, and not at all what I'd call "too pedestrian".  See for yourself.

Clearly this had been a service station at one point with a market or convenience store in the brick building right next to it, now joined by a passageway.  There's a wealth of detail, from the hubcaps in the window to the stacks of tires and the old vending machine under the lean-to shed on the left.  But what the front view doesn't clearly show, is what I believe makes this truly unique.  Look at this overhead view:

What the heck happened to that brick building?!?  It is as if it has been cut on the bias and half the structure just wiped off the foundation!  IFY?  I'd say more like Fishy.  There's gotta be a story behind this, and I'd bet it involves aliens, a tornado or a semi, or some combination of those.  Using the historic imagery slider on Google Earth, you can go back as far as 1993 and the building is like that.  Why?

If you model Colorado or just like ghost towns of the old west, go with the Yorke model - no doubt it will build into a fine structure.  But I submit that the building's namesake is also interesting and may do more to catch the attention of younger folks more interested in modeling what they see most of the time in the rest of the country.  It is also the sort of structure that raises more questions than it answers and that makes it especially appealing to me.


Tuesday, October 12, 2021

Kit-Mingled 2-8-0 - Fit Check VIDEO!

After gluing the cab floor and boiler backhead into one unit and adding styrene strips to the cab walls to hold it in place against the frame, I decided to do a fit check of the whole thing at this point.  So, I reassembled the loco and took it for a quick spin.  As I suspected, the longer Aristocraft boiler and cab closes the gap between engine and tender by approximately 1/8".  Even with the closer spacing the engine will still successfully navigate my 15" to 16" radius curves.  YES!!  That means I don't have to make a new drawbar.  I also decided I'm going to add a plug to the headlight wires so I can mount the light up through the boiler into the headlight housing and not have to fiddle with jamming it up in there each time I reassemble the engine.

Okay, enough blabbing.  On with the video:

Like, Subscribe and all that jazz, because when this thing is done I'll be making a follow-up video for sure.  I'm just tickled with how this project is coming along.  After the struggles of the 2-6-0 project, this one is a breeze.  On to the detailing.


Monday, October 11, 2021

Kit-Mingled 2-8-0 - Backhead

Here's the backhead and cab floor just set in place, not glued to each other, to test the fit.  The boiler and backhead will be glued to the floor.  This unit will remain loose, unattached to either the frame or the cab.  When the cab and boiler are set down over the frame it will effectively sandwich this in place and hold it there.  Then, if sometime down the road I decide to add more detail, I can remove it to make that work easier.  Currently I'm deciding if I want to add a plug inline with the headlight wires to make it easier to assemble and disassemble the engine.  The best part is no part.


Friday, October 8, 2021

Milk & Mail - Fruit Car Primed

With the completion of the sides, ends and roof details, I could prime the body for the Fruit Car.  I elected to upgrade the fascia and door track and add a slide bar but chose to keep the original door stop even though it is a bit oversized.  Whenever possible I like to use original kit parts.  For the damaged end I had to bend a new pair of railings and replace the broken two-part sill casting.  I covered the roof with tissue paper to represent canvas and replaced the roofwalk with 2x6 planks and 2x2 supports.


The underside was primed first with my usual Dark Walnut while the rest of the car received gray.  The trucks will be borrowed from one of the other two cars in this train, that is, either the shorty baggage or shorty combine from Binkley.  I will replace the wheelsets and reassemble the metal trucks with Loctite Weld.  I have been able to unsolder these vintage trucks with some success, but not without damage.  Next I'm going to try and simply cut them apart with a motor tool.  The original car rode on arch bars with flat springs.  I think it will fit better with a passenger consist on wood beam passenger trucks.

Wednesday, October 6, 2021

Kit-Mingled 2-8-0 - Frame Work

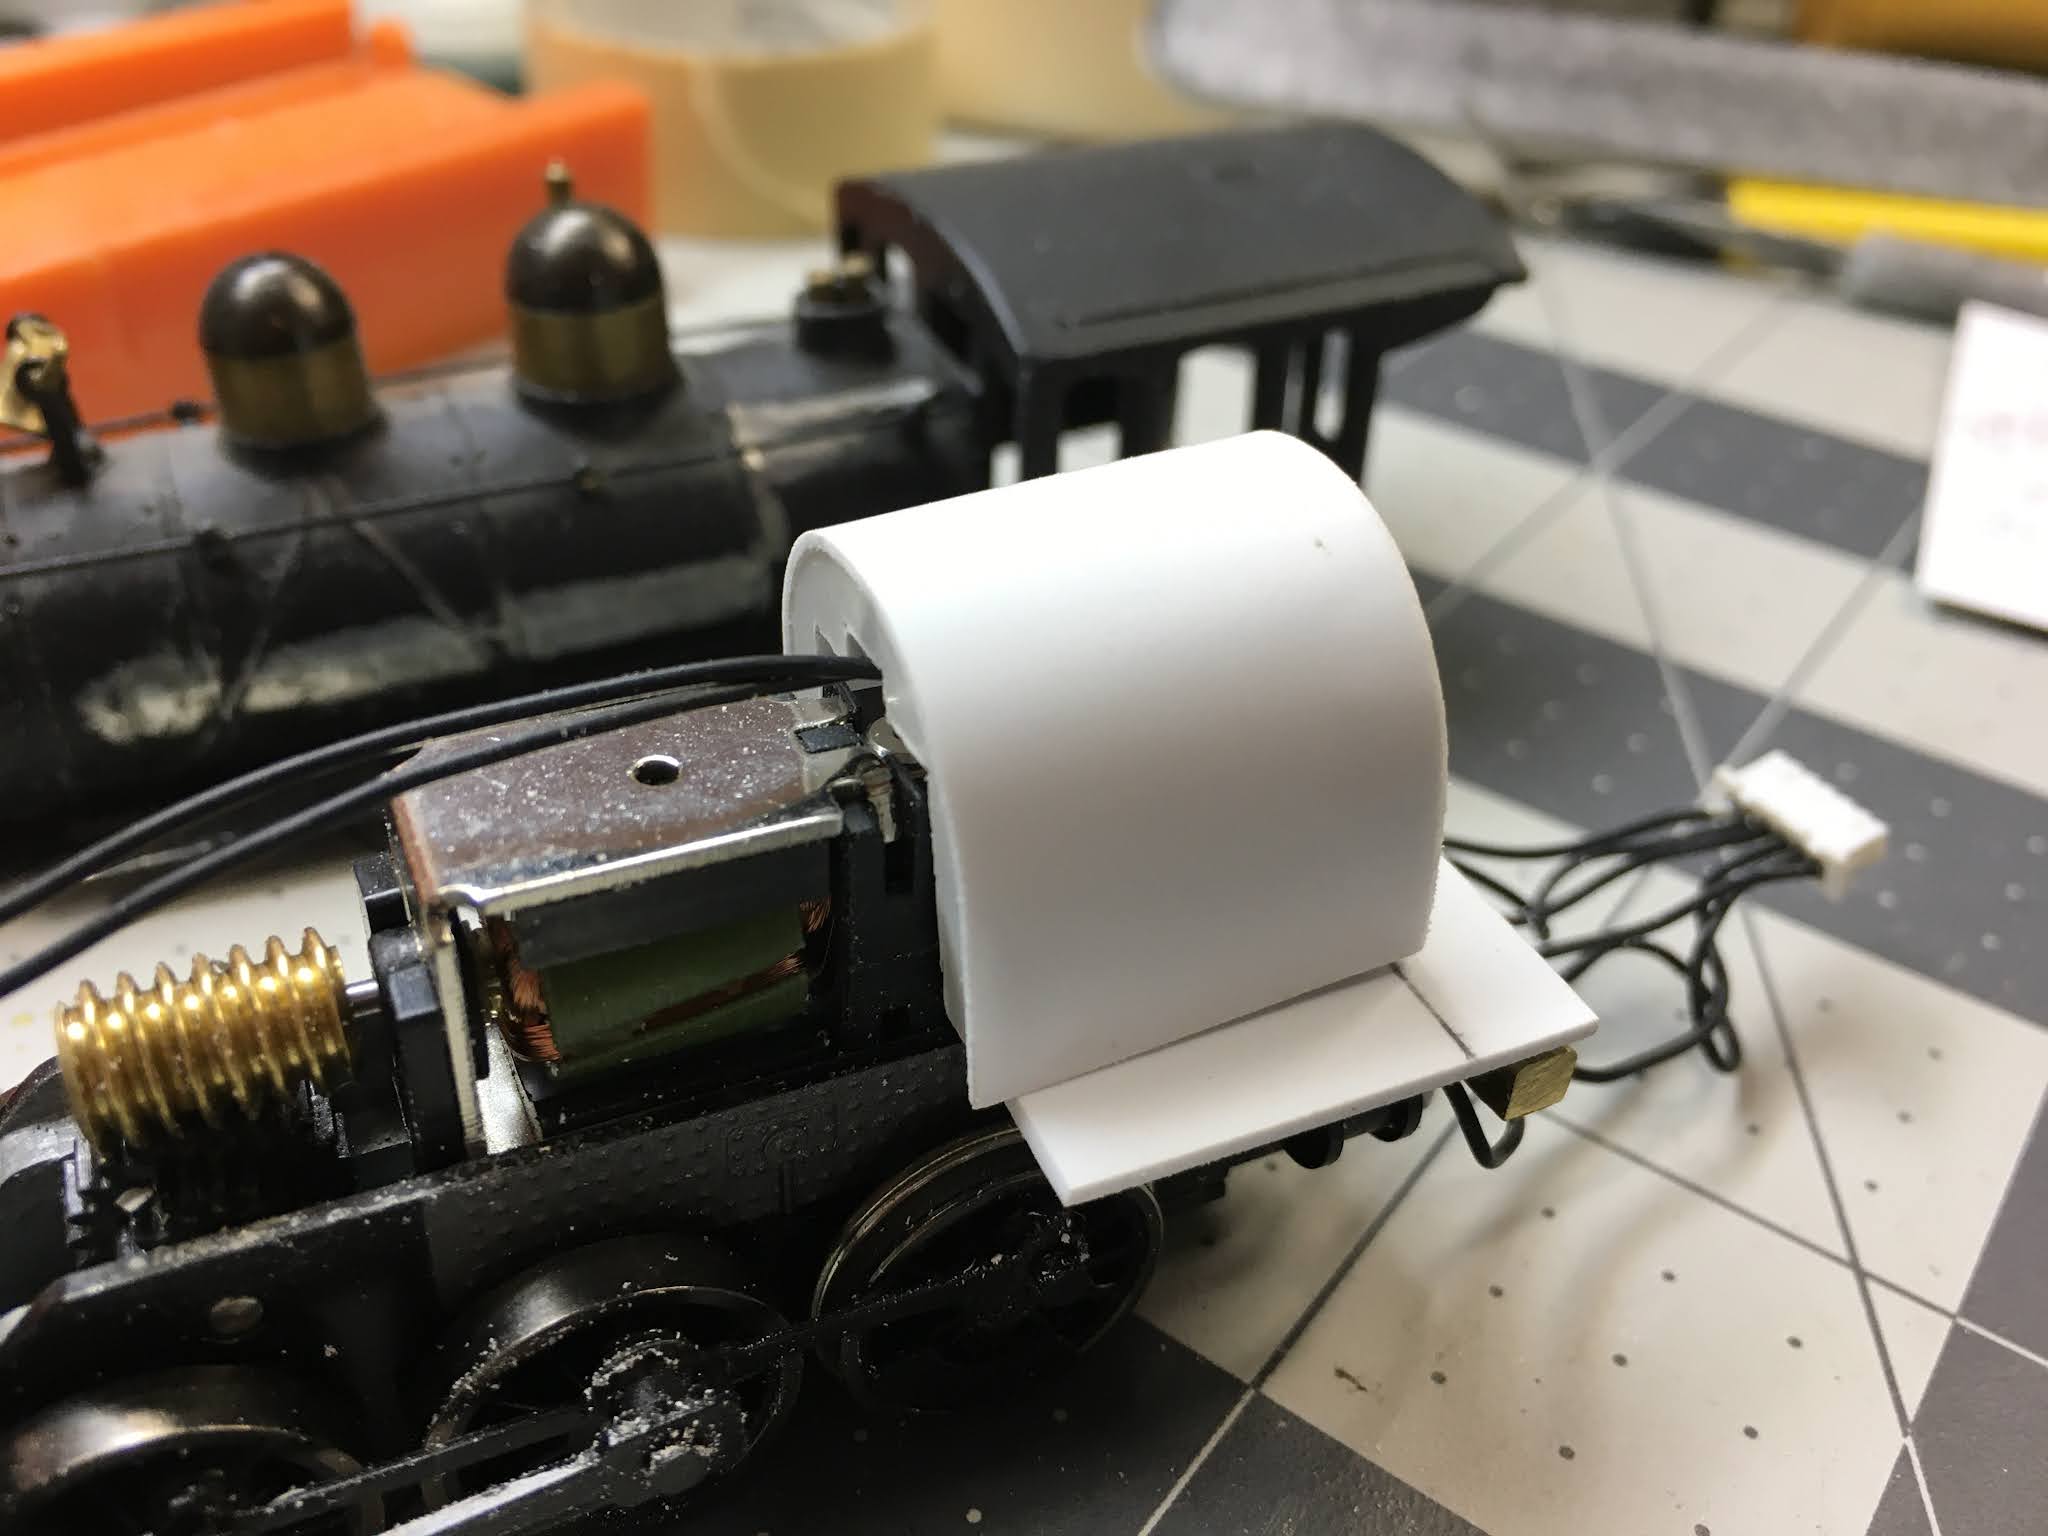
This update is really Part 2 of the last post on screws.  I finally finished the frame extension and mounting plate for the boiler screw.  I've been working steadily on each, but the marvelous gray goo I'm using to weld the parts together takes time to cure.  Still, I'm very pleased with the progress at this point and looking forward to the next step; creating a boiler extension inside the cab and mounting the backhead casting.  After that it's just a matter of adding details to the boiler until I'm happy before painting, lettering and weathering.  This isn't a firm date, but I'm shooting for finishing this engine before Halloween.


There's a nut "welded" up above the brass plate in the last image.  I didn't get a shot of that before I put it in place in the boiler, but I used liberal amounts of the Loctite Weld to secure it to the brass bar.  Getting the headlight LED fed through the smokebox up into the headlight housing might be tricky.  I bought two nuts so that I could have a spare if something didn't work, but also I can use one to hold the cylinder saddle in place when the boiler isn't attached.  This has turned out to be a challenging project, but very satisfying working steadily, step by step.