Search This Blog

Thursday, August 11, 2022

Cable Car Conversion

This post is the fourth in the series about how I built my Walthers National Model Railroad Build Off diorama.  In the first post I described how I made the brick street.  Next I discussed the thought process behind kitbashing a vintage plastic kit.  Last week I talked about some of the lessons I learned designing and composing the diorama itself.  This time I'm going to show how I kitbashed a Bachmann Cable Car into a horse-drawn streetcar.  

Here's the cable car during deconstruction and conversion.  I've been to San Francisco many times and I rode the cable cars years ago.  On a more recent trip my wife and I spent more time riding the buses, but I digress.  Next is a photo of the initial reconstruction.

In the above image the roof has been shortened and tacked together and the ends are being modified.  The donor car is, admittedly, pretty cheap but I think it has great potential.  They can be found on eBay or at train shows for a decent price.  Originally I planned to build a streetcar as a decomsissioned vehicle now placed as a tourist attraction at Strickland's Store on my late 20s era Pine Branch Park layout.  This is, ultimately, where this model will end up.  But for this diorama it needed to be in service.

The body shell has been given a coat of primer and the gaps from the roof reduction filled with putty and wet sanded.  The frame was scratchbuilt from styrene with end plates and railings in brass, soldered.  The bearings came from a Selley old-time passenger truck and the wheels are O scale spoked speeder wheels from Wiseman Model Services drilled to accept the axles from the Selley wheelsets.  The horse is a heavy metal casting, probably lead, of what I think is a circus horse; see the pointy thing between his ears.  This was carefully filed away and the head reshaped.

Here is a prototype picture I found.  There are many designs for streetcar bodies and most are similar, resembling a short coach body with clerestory roof and open platforms.  This particular prototype matches very closely the Bachmann cable car body, right down to the gentle arches in the windows.  Had I not been pressed for time, I may have modeled more of the lovely detail on the end platform railing and panel.  Mine is far simpler but still conveys the essence of the thing.

Lettering was done mostly one letter at a time using an alphabet sheet from K4 decals.  I chose Orange Avenue because it fit neatly using the yellow letters I had and helped set the scene in Florida.  The paint scheme was chosen after looking at several preserved horse drawn streetcars.  Yellow and brown seemed to be a popular combination, and the Tuscan Red roof is a classic choice.  I painted the horse as a big Palomino draft horse.  I already had dark brown and medium brown horses and a gray mule on the diorama, so it seemed a good choice.  

The tackle was mostly cast onto the horse but the reins are made from black electrical tape.  The swingle tree was scratchbuilt from styrene and wire with scale chain superglued into an arc behind it.  These bits are fiddly but the result is worth it in terms of realism and a fine scale look.  The driver is a Weston figure and the passengers are two seated townspeople from the Lytler & Lytler Ragtimers series.  The car body is removable to allow access to the interior.
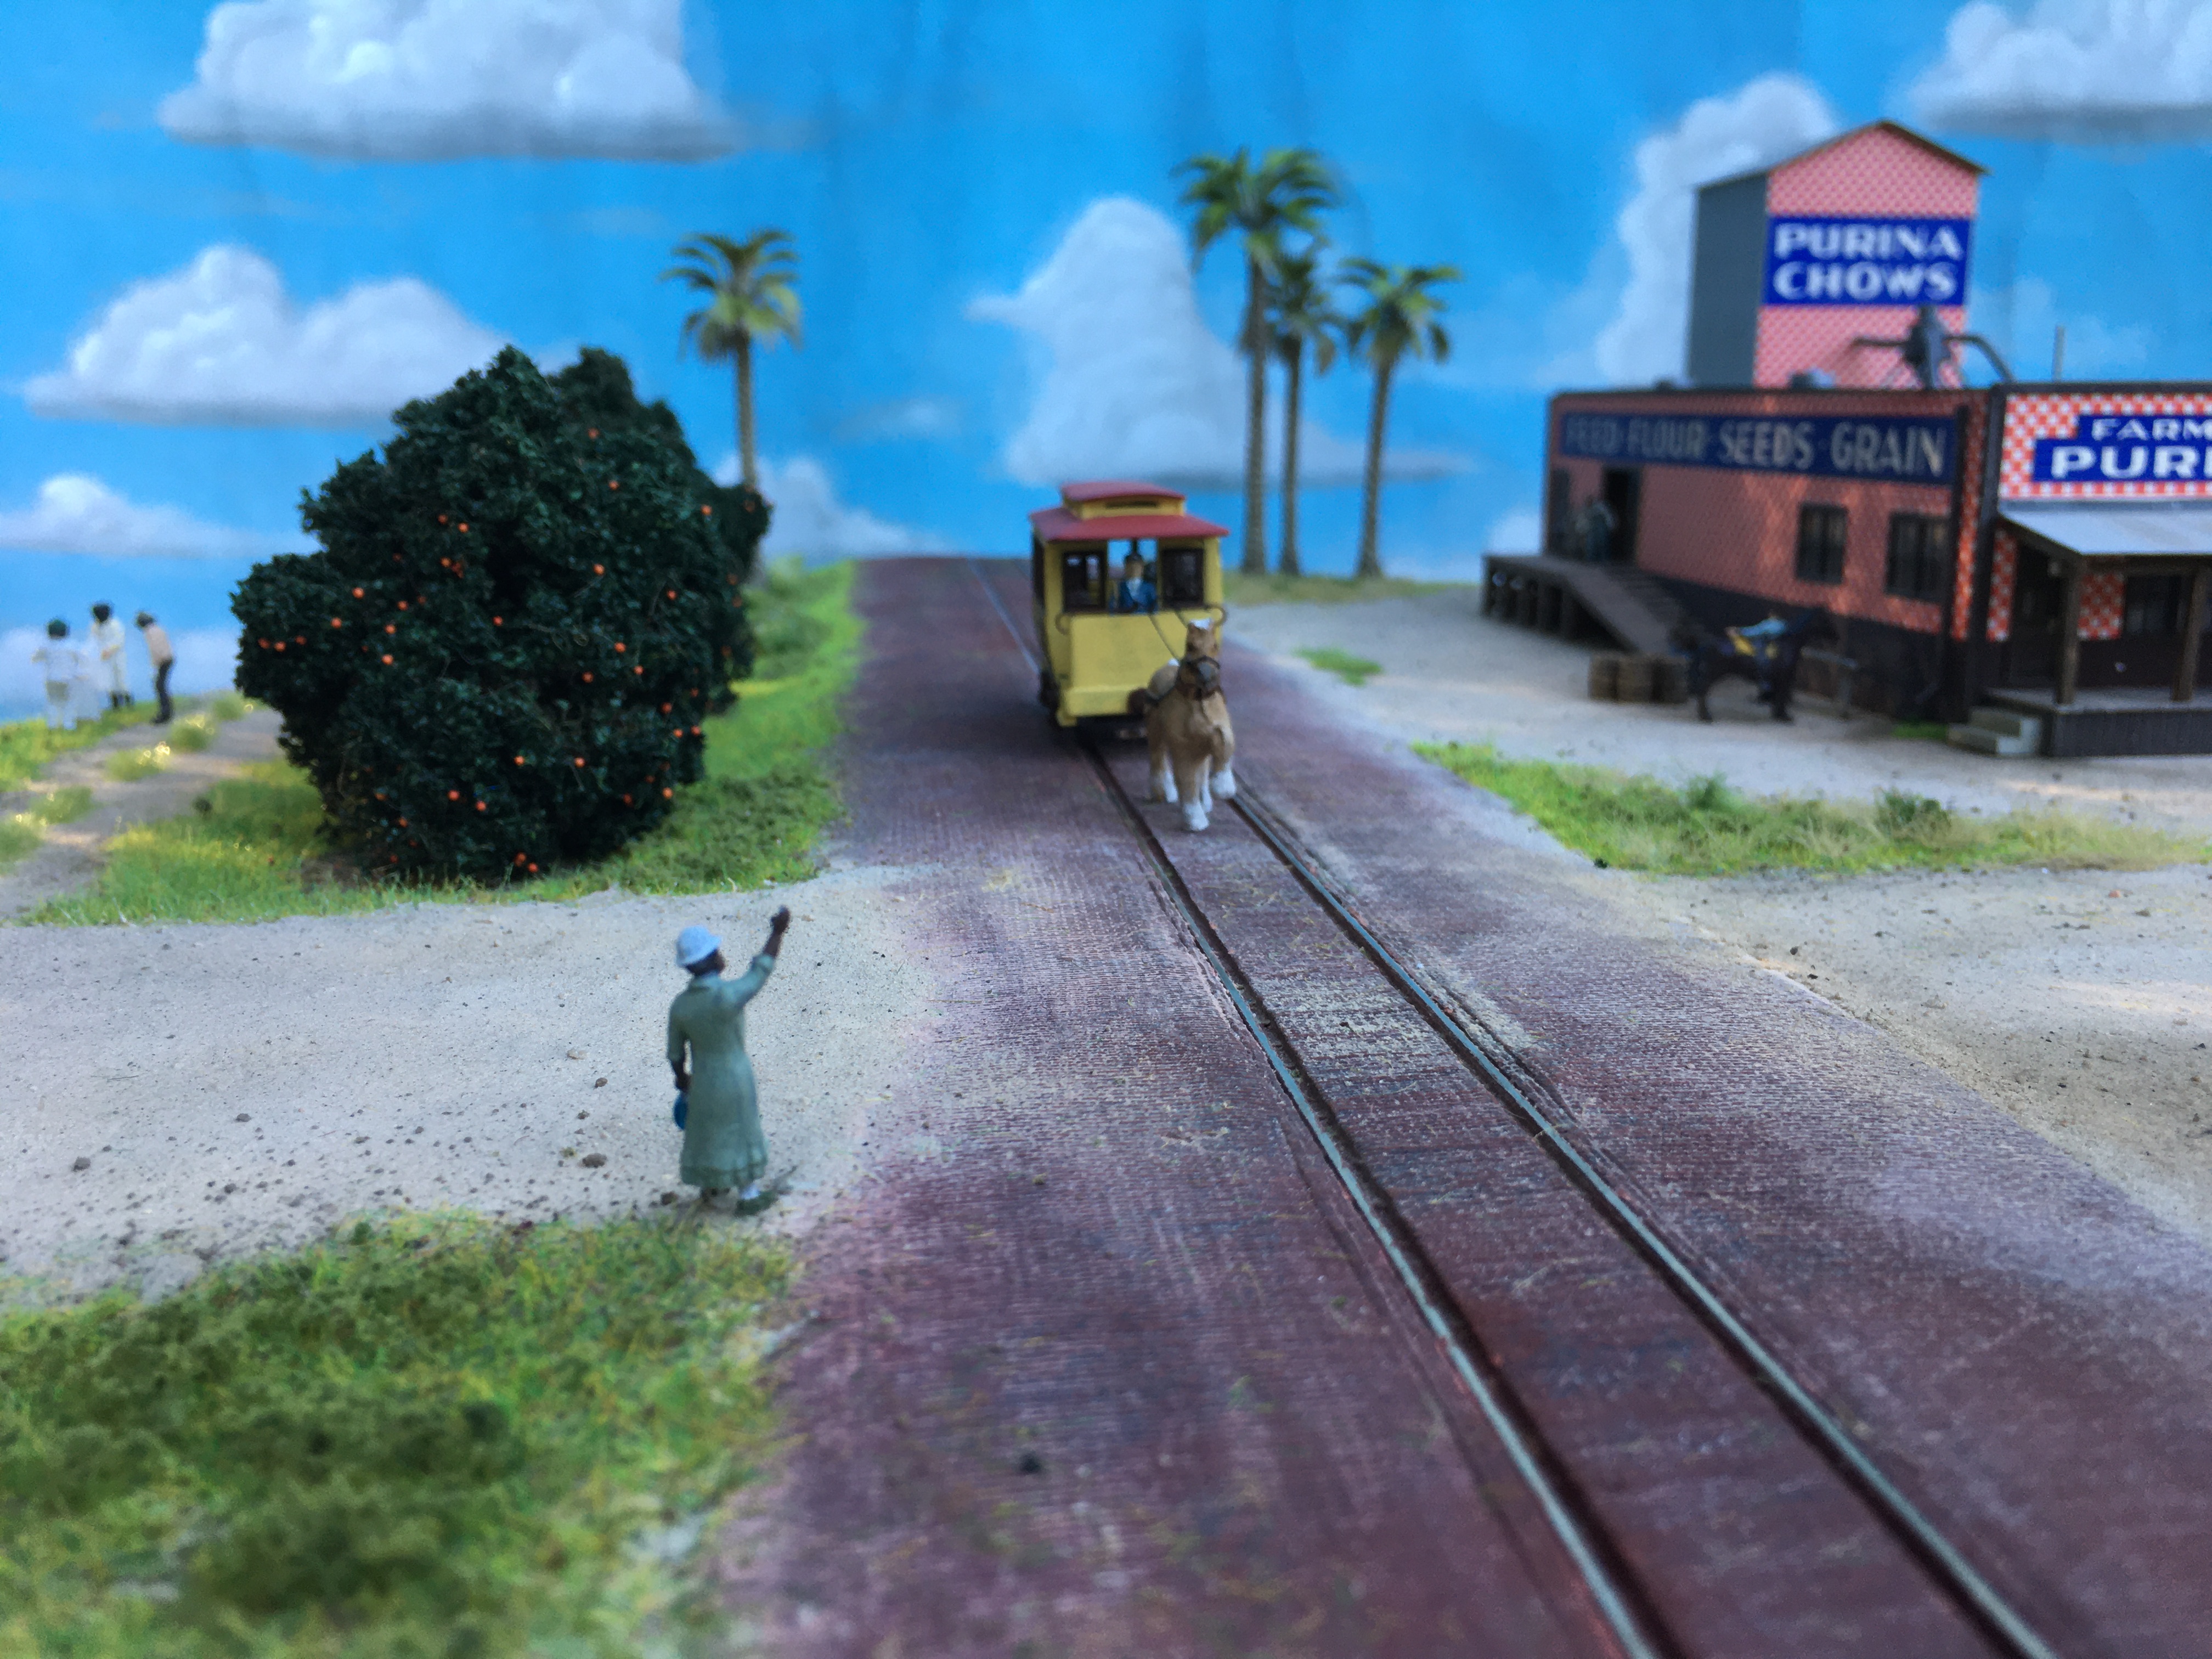
This last image sets the streetcar into the story.  The woman hailing the car is from Preiser.  I didn't submit this shot due to the obvious wrinkles in the sky, the poor lighting, and lack of focus at various depths.  Still, I like it for the story it tells.  Three mini-scenes are visible in this one shot, and they will be the subject of a future post.  I had a great time kitbashing this little car and using it to paint a picture of life at the turn of the previous century.

As always, thanks for reading, and feel free to leave your comments and questions in the field below.


Thursday, August 4, 2022

Lessons Learned

In this post I'll share a few lessons I learned from building a diorama for the Walthers National Model Railroad Build Off contest.  While building a diorama may seem like a simple, straight forward thing to do, it really challenged me to think differently.  The process also made me realize a few things about myself and my approach to the hobby; beliefs I had held but never clarified into solid ideas. 

This is a BIG image if you'll click on it, then open the picture in a new tab for the full size.

First off, this diorama taught me that I could fully scenic a 2'x4' space in only four months, from ground cover to scratchbuilt trees, four feet of brick street, two feet of hand-laid track, three craftsman structure kits, a kitbashed structure, a Jordan vehicle, a kitbashed streetcar and numerous figures, all hand painted.  My current model railroad is only 4'x6' - that's just three times the area of the diorama.  Plus, the Purina Mill, Strickland's store, streetcar, billboard and orange grove all have spots already marked out on the railroad once I decommission this diorama.  If I were to work at half the pace I did to get this diorama done, I could have the Pine Branch Park railroad scenicked in two years or less, to a very high standard of detail and realism.*

Four feet wide

In this contest the focus was strictly on two parameters as defined by the rules; creativity and skill.  I set out to tell a story about a place in central Florida in 1914.  My model railroad has a similar goal, but is set in the late 1920s and includes operating trains as part of the storytelling.  Both use creativity and skill, but the diorama is a more limited setting.  Instead of operating the trains to provide action that tells the story, the setting itself has to do that task.

Why is this man sleeping behind this sign?  Some stories raise questions.

In truth our models, apart from the ones that move, all face the same challenge; how to imply action without motion.  While building my horse-drawn streetcar I realized one possible reason for why more folks don't model this mode of transport; it can't be made to move realistically.  A powered streetcar pushing a lifeless horse down the street would look odd, yes?  Some modelers don't like to use figures that are in an "action" pose, as if time is frozen, because it looks strange next to a train that does move.  On a diorama with no moving trains this matters less, if at all.

Is this a train?

Another challenge I faced was whether or not to use a backdrop.  Modules or home layouts often include a backdrop and the Walthers contest did not require one.  However, the contest submission form called for photos of the "front", "left" and "right" sides of the diorama.  Oh.  I hadn't considered front or back, left or right when planning the scenes.  It was a diorama to be viewed from any angle, and engaged with by the viewer from any direction.  This arrangement made it difficult for me to designate a "front" of the diorama. 

You can't see this from the front.

As someone with an "island" style railroad (see more about that here) I've always built structures with an eye to how they'll look when viewed from all sides.  On a layout where the views are controlled structures and other scenic elements can be built to take advantage of that, omitting back walls for example, or only detailing what will be seen.  On my diorama different views and vistas would open or close as the viewer moved around the scene.  This is how I had begun to imagine the elements on my layout so naturally it is how I placed these elements on the diorama and why all sides received some level of detail as appropriate for the scene.

Did my design choices hurt my chance of winning the contest?  Perhaps.  Most of the entries that made the final cut were pretty clearly arranged with a defined front and back, though not all.  What about the railroad elements?  None were required for the contest, technically, though a train did need to be shown in the final photos.  I think a horse-drawn streetcar is a train and though I had no freight car on my spur at the feed mill, one of the finalist entries showed no train at all.  And the era?  Or locale?  Perhaps.  Very few folks model Florida and nobody I've seen models Florida in the teens or twenties.  This is new territory in our hobby, and sometimes the familiar scene will win out over the unfamiliar.

Figure provided for scale. ;)

Would I do it differently if I were to enter again?  Maybe...or maybe not.  My design choices were deliberate even though I wasn't fully conscious of all the assumptions influencing my choices.  A viewer can't see it all from any one angle, just like real life.  It tells a story through the composition of elements and placement of details.  The setting is unique and hasn't really been explored before.  It demonstrates skill and creativity.  But most of all I'm happy with the diorama I built - it makes me smile whenever I look at it. 

Thanks for reading - feel free to comment below or ask questions.


*Completing the current model railroad will likely take longer than two years.  As of this writing I'm still unpacking boxes and sorting my garage, and won't be doing any more work on the railroad in situ until I know the roof won't leak and rats won't be chewing the scenery.  I'll be following Bruce and Janet Chubb's example from their early modeling days, building models at the kitchen table until the train room is ready.

Wednesday, July 27, 2022

Kitbashing Speedy Andrew's

This is the second installment of my "how-I-did-it" articles chronicling the development of my NMRBO22 entry diorama.  For part one, see the previous post on how I made a brick street with track for a horse-drawn streetcar.  In this post I'll show progress pictures and discuss my thinking behind turning an AHM "Speedy Andrew's Repair Shop" into my "Strickland's Speedy Service and Souvenirs".  For some interesting history on the original structure, and other fun kitbashing ideas using these kits, see JD Lowe's 30 Squares blog and search for "speedy" or just click the link.

In the photo above you can see some of the kit parts laid out alongside my mock-up and a few other parts I had in mind to use.  The mock-up was made by photocopying the kit walls and gluing them to cardstock.  In the end I didn't use the brick card or the pre-printed shingles but did use the metal doors and shutters.

Here are the original kit parts.  I like to use as many of the walls as possible, even if they don't make it as walls.  Not pictured is the wood textured "ramp" you were to place at the garage entrance; that part became the two signs over the drive-though bay on my model.  Speaking of which, that was the element that made my redesign click.  That big false-front entrance wall is the dead giveaway for the kit origins.  I had to do something to disguise that, so I re-imagined it as a sign above two pillars, using cut-offs from the walls to add bulk.  The "interior" wall from the kit became the drive through ceiling.

Another trick I used to hide the kit's origins was to eliminate the "L" shape of the building and reorient the main entrance in relation to the big sign.  The weakest elements of the kit, in my opinion, are the windows and doors.  I subbed two metal doors (either Dyna Models or maybe Sequoia, I can't be sure) and added Tichy shutters to the windows.  On this wall I shifted one window a bit towards the door so they'd be symmetrical and used the shutter to hide the gap that created.  The little bump-out at the back of the building is the sort of thing that just happens organically during kitbashing.  Once the main building is set, those remaining pieces you haven't used just cry out to be used somehow!

And here's the finished structure, showing the final elements I used to hide the kit's origins - the standing seam metal roof in place of the cast shingles and the signage.  DISTRACTION!  If I'd only used the main sign with the lovely arch in the top it might have been too easy to say "oh, that's that old AHM kit I've seen before".   The two signs on the sides perpendicular to the main sign, centered as they are over the drive-through, create a sense of weight and bring balance to the structure over and against the main building with its side-entrance and porch.  

The building in situ, with a mini-scene to tell the story.  Strickland stands on the porch welcoming the dapper gent, who has just pulled up in his brand new 1914 Austro Daimler 18/32 Cabrio.  Jeb and the kid look on, wondering just how much this man will buy.  No doubt they have a hundred other questions they'd love to ask him.  If he stays long enough maybe they'll get to.  He's just the sort of tourist they've been seeing more frequently ever since the county paved Orange Avenue, opening their part of central Florida to the rest of the state, and beyond.

The other side of the building, with more signs.  The brick paper I did use came from Walthers - from the middle of the last century.  It was the right balance of red, orange and gold to suit the colors I had in mind for this building.  The large signs were created in Gimp, the ads are from JL Innovative and other sources.  The smudge pots don't look too dirty or rusty because they're new.  They're resin castings from California Model Company and are the right style for the period.  So too the gas pump - it came with the kit, and is actually a pretty close match for the ones used in the 19-teens.  The more common glass-top pumps didn't become popular until the 20s and 30s.  

Leave any questions or comments down below, and thanks for reading.


Tuesday, July 19, 2022

Old Florida Brick Street

This post is the first of several detailing how I built my diorama for the Walthers National Model Railroad Build Off 2022 (nmrbo22 in the tags).  In this installment, I show how I built the brick street.

When I decided that I needed to have a brick street on my diorama I began searching for options on how to make one.  Walthers sells a plastic kit with injection-molded segments that looks pretty good, but then you've got to deal with section joints - not impossible, but not how I wanted to go.  Also, it's pretty hard to get the crown of the street looking realistic.  Brick texture sheets in plastic and laser-cut material are also available but present similar challenges.

Here's a prototype image of the look I was going for.  This image in general was a great source of inspiration for the overall look of the diorama, with a streetcar track added of course:

Finding no ready-made solution, I looked into making my own.  First I tried hand-embossing brick using a paintbrush ferrule with the bristles removed and bent into a crude rectangle.  The material is DAS clay and the girder rail is simply two rails with one laid sideways up against the web of the other.  This is the result:

This wasn't half bad, but the "bricks" looked more weathered and rounded, like rough stones.  The girder rail looked okay but again was too large and urban for my early 'teens setting.  This technique was also a lot of work and my carpal tunnel nerves were not happy after just this small test piece!  So, I ordered a 3D printed brick roller from Rail-N-Scale on Shapeways.  Here is the result of that first test (you may want to open link in a new tab for a better view):

MUCH finer detail; almost too fine, but I'd rather err in that direction than to be too chunky.  No special rail needed - this is code 83 flex.  Using the tool as it came from the maker was awkward, so I followed Martin's (Marklin of Sweden) advice and made a roller arm.  I used a cheap detail paint roller from the hardware store, all of $3.00.  The smaller roller with the ridges is for street track while the wider one on the handle is for making plain brick texture.

While the DAS clay comes in a nice terra cotta color, I wanted a dark, over-fired red and blue-black color scheme for the bricks based on existing historic brick streets in Florida.  Google "The Old Brick Road" and you'll see a surviving example of an early Florida highway.  Here's what I came up with on my test sample:

And here's how it looked on the diorama after all the scenery was in place.  There's a defined edge but as you can see, the dusty sand has found its way up onto the street in places, especially at the intersection with the dirt road.  This image was not submitted to the contest primarily because of the background - the street just drops off into nothing behind the streetcar.  However, note the camber of the road - something that would have been very challenging to do with styrene sheet or other brick textured material.

Final thoughts on the tool and technique; the tool is worth it but it takes practice to use and patience to let the clay rest before texturing.  The fine texture means mistakes such as drifting or over-marking the texture aren't as visible unless you look closely or the light catches the brick detail just right.  Will I use this tool again?  Absolutely.  There is no finer-scale brick texture out there unless you're willing to draw your own and have it laser cut (as Tim Warris did for his Bronx Terminal).  In fact, it has me rethinking the paving on my Pine Branch Park street scenes.

Thanks for reading, and feel free to share this article.


Thursday, July 14, 2022

Time to Think

Another "pre-stuffed" shot of the garage.  Future staging yard?  or...?
 

"You have to think about your stuff more than you realize but not as much as you’re afraid you might."

- David Allen, Getting Things Done
 
These days I'm thinking about my stuff.  Moving does that; it causes us to reevaluate our stuff.  Where will it all go?  To those moving into a larger space the question is simple to answer.  But for those downsizing or adjusting to a differently laid-out space the question is harder and involves a longer decision tree.  What is this?  Will I keep it?  When was the last time I used this?  Is it worth more to keep or will it cost less to replace?  When the cost of the home is divided by the square footage and that price-per-square-foot number sinks in, suddenly the question of what goes where takes on a whole new weightiness and heft.  The value of the stuff comes into question in terms of return on investment, play value, sentiment, etc.  

The quote above from David Allen, one of my favorite authors and a person I'd consider a mentor through his writing and videos, is especially apt at this time.  A few moments each day thinking about the stuff - asking the appropriate questions about it and making determinations - pays great dividends in generating movement and actions that lead to a well-organized home full of the sort of things we love and want to surround ourselves with.  Chief among those questions is this, "How do I want to use this stuff?" or a better way to put it, "How does my intended use of this stuff reflect who I am and who I want to be?"  Yes, I know, a deep, philosophical question on a model train blog.  You may be thinking this is too much, it is just stuff after all.

But I'd argue that the thinking is worth it.  Kristi and I have always told our boys, "People are more important than things".  Does our relationship with our stuff reflect that reality, or our intention to live that way?  Is our home a place for people beyond our family?  Does the placement and care of our stuff enable us to be closer to one another, open to others, or does it reflect a more private life?  Or all three?  My garage will be my space - hence the possessive pronoun - but will I share it?  Will the railroad I design for that space be a private world, only occasionally viewed by family and friends, or a more public space?  How I answer that question will have a bearing on how I arrange the stuff in the space.

Tuesday, July 5, 2022

Set Back or Step Forward?


The new garage before the rest of the stuff arrived.

To answer the question in the title, YES to both.  First, the setback.  Despite all the difficulties of the previous garage home, I had grown accustomed to it.  I had made improvements to the space, mainly in keeping rodents out.  I could find a tool or supply in thirty seconds or less and had room to work.  There was a plan for building and operating the railroad, as well as other projects such as helping my son build a pan-tilt-zoom head for live-streaming or creating a diorama for the 2022 Walthers National Model Railroad Build Off.

Now, in a new space, I have to start all over.  New critters to keep out.  New holes to plug.  Dust and debris (just look at the pile of clay roof tiles along the wall!)  And, this space is detached.  If I want to get to the railroad I have to traverse the summer heat or winter rain.  At least it doesn't snow here.  In addition, I've got a long honey-do list and home renovation projects that must be done sooner than later.  That pushes any hobby space improvements far down the list.

...on the other hand...

This space is mine.  No need to get permission from the landlord to make any necessary changes.  Oh I had a long list of things I'd have done in our rental IF the place was ours.  Well, now this place is ours, and I can do what I want to make it wonderful.  I waited too long to improve previous places we've lived, and each time we moved I was a bit saddened that I should have or could have done this or that if only...  So this time I'm not wasting any precious moments.  Call it a mid-life crisis or whatever you will; I'm motivated to make it happen as soon as possible.

And while the layout will languish until everything is unpacked, modeling will not cease.  I've got an army to paint - Rebels and Storm Troopers and Speeder Bikes!  After tasting how fun it was to play a game of Star Wars Legion last Thanksgiving, I resolved then to get this game going in the near future.  That time is now.  I can set up a painting desk in the new house and enjoy a few moments each evening putting paint on plastic so that we can play an exciting tabletop game in our dining room.  

Finally, does this mean the blog is back?  Well, yes, but there's no guarantee it'll be anything remotely regular.  As I mentioned in the previous post from two months ago, I believe blogging is for fleshing-out ideas beyond what a picture can convey.  I will continue to use Instagram and link that app to Facebook to keep my family and friends updated, but if anyone wants to learn more this will still be the place to do that.  Thanks for reading.

"The only difference is that today, with what we know and what we're learning to do, we really can bring our dreams to life. It takes a lot of work, but the truth is, if we can dream it, we can do it." - dialogue from Horizons at EPCOT Center

Wednesday, May 4, 2022

A Time of Transition

Hello readers!  It has been a few months since my last post and in that time I've been thinking about this blog.  While I set out to create a place to share my hobby with family and friends, along the way I began to realize the blog was a creation unto itself beyond my original ideas.  I also realized that the blog wasn't working like I'd intended and that simply creating posts for their own merit, while interesting, wasn't enough to sustain the effort I was putting into that work.  Add in the Walthers 2022 National Model Railroad Build Off contest, and the blog was the first thing to go to make room for that undertaking.

Now there's a move on the horizon to a new home, and a new phase of life.  My mother will be moving across the country to live with us and this is a wonderful, exciting adventure for her and us together.  There's no firm timetable as of yet, but as with any such transition, it will happen when it happens and it will likely happen all of a sudden.  The hobby as it stands, and so much else, will be put on hold and set into stasis until we're settled into the new place.

Will the blog resume when the dust settles?  I don't know.  During the construction of my entry in the Walthers contest I have begun utilizing Instagram and Facebook to share my progress as it is far simpler than creating a blog post.  I believe blogging is for writing, explaining, and presenting ideas that require more than a photo can provide on its own.  (This is why "Wordless Wednesday" posts make little sense to me on a blog platform.  They may not be useless in a larger scheme of sustaining interest in a blog; they just aren't taking full advantage of the functionality of blogging.)  But I have found far more connection to my family and friends through those platforms than on blogger.  This was the original thrust of the blog after all.

Thank you to all who have regularly visited this blog.  I hope to post an update on the topics I've begun here, to tie up loose threads, sometime in the next year if not sooner.  

Galen